What's new
Photoshop Gurus Forum

Welcome to Photoshop Gurus forum. Register a free account today to become a member! It's completely free. Once signed in, you'll enjoy an ad-free experience and be able to participate on this site by adding your own topics and posts, as well as connect with other members through your own private inbox!

Adding simple shadow effect to invitation cards


oodya

Well-Known Member
Messages
79
Likes
10
Hello,

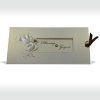
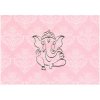
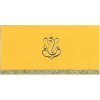
I am wondering if anyone can help. I am looking to add a simple shadow to some invitation cards (on the sides) - please see the attached 'invitation card shadow' image to show an example of what I am looking to achieve. The two 'to add shadow files' are the example files that I am looking to add a realistic shadow to.

The images have been scanned, but I feel that adding the shadow will allow it to look more realistic (like it has been taken on a camera).

Can anyone help?

Thanks,

Oodya
 

Attachments

  • Invitation card shadow.jpg
    Invitation card shadow.jpg
    33.8 KB · Views: 24
  • to add shadow 2.jpg
    to add shadow 2.jpg
    142.6 KB · Views: 2
  • To add shadow.jpg
    To add shadow.jpg
    105.6 KB · Views: 2

dv8_fx

Retired Administrator
Messages
13,761
Likes
4,789
Is this what you mean?...

To add shadow _ dv.jpg

Use the rectangular selection tool to isolate and duplicate the scanned card on a layer. Add a drop shadow LAYER EFFECT. I added a slight inner shadow effect on the inner sides. I also used the burn tool to slightly "scorch" the edges of the card.....

Experiment with the effect settings to get a look you like.....


edit.... just a thought.... if you use the pen tool to isolate Ganesha on a layer, you can add an emboss effect to it to make him pop out....

Getting ready for Deepavali ?.....
 

IamSam

Administrator
Staff member
Administrator
Messages
22,752
Likes
13,268
Maybe something like this?

Screen Shot 2015-10-31 at 9.17.06 PM.png

There's some odd gradient banding in the screenshot that's not present in the original.
 
Last edited:

oodya

Well-Known Member
Messages
79
Likes
10
Hello,

Thank you both for your replies. They both look excellent. I am probably a bit more swayed to use iamsam's approach. Can you kindly advise how this was done please? As well as this, how would it look if we were also to add a similar shadow in the bottom right corner (similar to the one in the bottom left corner)?

Thank you both again very much!

Oodya
 

IamSam

Administrator
Staff member
Administrator
Messages
22,752
Likes
13,268
Hey Oodya, in actuality, there would not be a shadow at all behind the card if a photo was taken by a professional photographer. The only way your would have any shadow, much less two, would be if the lighting was set up in both the left and the right side as to create the double shadow. To me the shadows should really not be there.

But if that's what you want then there's no reason why it cant be done.

Hopefully you have better images of the invitations than the one you posted. They are not that great.

The very first thing you should do is to isolate the card from it's background.
You need to crop it close to eliminate any residual shadowing from the scanning process.
Screen Shot 2015-11-01 at 12.35.29 PM.png
 

IamSam

Administrator
Staff member
Administrator
Messages
22,752
Likes
13,268
Next you want to create your background.

You can use any colors you like, I used black and white.

First I made a solid white background.
On a new layer I used the Gradient Tool with the "Foreground to Transparent" preset and set to black, to create a gradient from the bottom upwards.
Hold the shift key while making the gradient.
Screen Shot 2015-11-01 at 12.42.20 PM.png

Lower the gradient layers opacity to your liking.
Screen Shot 2015-11-01 at 12.42.31 PM.png

On a new layer, use the Rectangular Marquis Tool to create a selection.
Screen Shot 2015-11-01 at 12.43.06 PM.png

Again, use the Gradient Tool to create anther gradient within the selection. This will simulate a wall or flat surface behind the invitation.
Screen Shot 2015-11-01 at 12.44.03 PM.png

Hit Cmd/Cntrl + D to deselect, then lower the new gradient layers opacity to suit.
Screen Shot 2015-11-01 at 12.45.08 PM.png

This will be your background.
 

IamSam

Administrator
Staff member
Administrator
Messages
22,752
Likes
13,268
Turn on the card layer and select/highlight it.

Just for demonstration, I have added guide lines, you don't need to do this.

Starting from here....
Screen Shot 2015-11-01 at 12.55.15 PM.png

Use Free Transform function (Cmd/Cntrl + T).
Right click and choose 'Perspective'.
Hold the the shift key and mouse click either of the top control handles and move slightly towards the center.
Hit the check mark (tick) or hit enter to accept the changes.
Screen Shot 2015-11-01 at 12.55.45 PM.png

Next, create a new layer.
Click on the the card layers thumbnail to make a selection.
Screen Shot 2015-11-01 at 12.57.23 PM.png

Again with the Gradient Tool, add a gradient from the bottom of the selection line to about half way up.
Screen Shot 2015-11-01 at 12.58.57 PM.png

Hit Cmd/Cntrl + D to deselct.
Lower this gradient layers opacity to suit.
Screen Shot 2015-11-01 at 12.59.20 PM.png
 

IamSam

Administrator
Staff member
Administrator
Messages
22,752
Likes
13,268
Ok on the shadow layers, here's where it gets a bit tricky.

Create a new layer below the card layer.
Turn off the card layer.
Turn off the card layers gradient (that we just made above)
With the new layer we just created selected/highlighted, click the card layers thumbnail to make a selection.
Screen Shot 2015-11-01 at 1.10.11 PM.png

Again with the Gradient Tool, create a stronger gradient than we did before.
Screen Shot 2015-11-01 at 1.10.41 PM.png

Duplicate this layer. (Cmd/Cntrl + J)
I would name the layers shadow 1 and shadow 2

Turn on the Card layer.
Turn on the card layers gradient.

Now select the shadow 1 layer.
Enter free transform.
Right click and choose distort.
Grab the middle top handle and move the downwards and to the left.
Screen Shot 2015-11-01 at 1.18.37 PM.png

Hit the check mark or enter to accept the changes.

Repeat the above process for shadow 2 layer.
I would use a guide line to get them even.
Screen Shot 2015-11-01 at 1.22.09 PM.png

Now all you need to do is add a Gaussian Blur to both shadow layer and lower their opacities.
Screen Shot 2015-11-01 at 1.25.09 PM.png

I did forget to mention that I added a Bevel and emboss layer style to the card layer.

If you have any question, please ask.
 

Top