What's new
Photoshop Gurus Forum

Welcome to Photoshop Gurus forum. Register a free account today to become a member! It's completely free. Once signed in, you'll enjoy an ad-free experience and be able to participate on this site by adding your own topics and posts, as well as connect with other members through your own private inbox!

Advanced help needed bad


creeper

Member
Messages
13
Likes
1
I am trying to put a catalog together of my indian artifacts. I need to turn a color picture into an actual drawing with pencil shading. I can turn my pictures into black and white sketch,but need help and instructions on how to put brush strokes in the place of the shading. I cant do each one by hand, it would take years. Here are examples of what I am trying to achieve. Thank you all! your awesome
 

Attachments

  • example.jpg
    example.jpg
    1.9 MB · Views: 3
  • woodfordclovis.jpg
    woodfordclovis.jpg
    414.6 KB · Views: 6
  • newexample2.jpg
    newexample2.jpg
    387 KB · Views: 2
Last edited:

creeper

Member
Messages
13
Likes
1
Sorry. The first pic is what I want to do with the second picture. The third pic is what I get when I use the basic technique
 

thebestcpu

Guru
Messages
2,988
Likes
2,747
Hi Creeper

Just for clarification. Do you want a fully automated process such as from a plugin or do you want the bush line width that you draw to vary by the underlying tone of the image?

I think the former may not give lines exactly exactly as you want (yet more automated), yet the later would require you to brush the arrowhead facets yet the line width of the stroke could be controlled by the underlying tone.

Thought the extra info from you would help target suggested recommendations.

John Wheeler

ADDED EDIT: Also clarification of the target media. Can you only have black and white, line drawings, gray tones, and/or will it end up being halftone printed?
 
Last edited:

creeper

Member
Messages
13
Likes
1
Thanks for the response. The look I need to get is picture one. So I need to process pic 2 to get the effect in pic 1. PIC # is only an example of what I have been able to do in cs6. I am looking for a plugin or a combination of filters to automate it as much as possible. I know this is difficult and may be an ULTIMATE CHALLENGE!
 

Paul

Former Member
Messages
12,879
Likes
7,023
All i did was to use the artistic selection then use angled strokes from that palette then did a thresholds adjustment, with more fine tuning you could get close to what you desire.

draw.jpg:thumbsup:
 

thebestcpu

Guru
Messages
2,988
Likes
2,747
Hi Creeper

I will give some examples of what can be done more automatically.

First though I am a bit confused. In a separate thread, you had mentioned possibly using crosshatch. In this thread you want something that is high quality line art.

In addition, if you are cataloging your arrowheads, why do you want to use line art in this day and age where you can include in your documents the actual image itself in color. Line art of old was primarily because putting images in documents was not possible so detailed line art was commissioned. It is used today because it looks cool yet it is acutally a lot more work and less accurate for documentation purposes. I am more curious than anything else as you can do the cataloging as you please. Yet to be honest, if you want an automated way to create line art to the level of detail and similarity to your image in number one, I suggest you need to be prepared to pay someone to develop a plugin for you if one is not available. For me, the challenge is way more time than I have to invest yet there may be other forum members that may give it a crack or know a slick way of doing so.

Below are three examples.

Example 1 use filters available in Photoshop. Example 2 is an example of straight lines whose width is adjusted by the lightness or darkness of the image (akin to halftoning techniques). Example 3 is something you can get through Topaz Graphics filter.

Well, I hope some are of interest and good luck with your project.

John Wheeler


Example-1.jpg
example-2.jpg
example-3.jpg
 
Last edited:

creeper

Member
Messages
13
Likes
1
Thanks you guys! Those are all a big help. I am going to try your techniques. I am also working on my photographs, to enhance the shadows before I try to process it. I will let you know how I do. Thanks again
 

Tom Mann

Guru
Messages
7,223
Likes
4,343
My strong suggestion is that you work on the photography, particularly, the lighting, before you do anything else. It will make the processing vastly easier. With the proper lighting, you could achieve vastly better surface relief in the specimen. You want the light to be coming from all sides (ie, 360 degrees in azimuth), but just raking over the surface. Have the lowest angle of light be around 10 or 20 degrees, and the highest angle (ie, furthest above the surface) be about twice the minimum angle (ie, 20 to 40 degrees). The exact angles will depend on the particular sample you are photographing. If you know what a conventional light tent looks like, think of constructing one that is in the shape of a short cylinder where the height is only around half the diameter. The lighting is vastly more important than what camera you use, and it gives a good starting point for postprocessing.

Here is a quick example I threw together to illustrate the benefits of proper lighting. I didn't have a fossil, so instead, I used something of similar size and with a lot of surface relief, an old kitchen sponge.

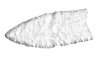
First is a shot with all the light coming from near the camera. Note that the surface texture is dramatically suppressed.

01
01-IMG_2933-sponge_front_lit-jpg-acr-ps01a-01_698px_wide.jpg

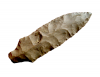
Next is a shot with window light coming from one side at around the same height as the sample and a simple white reflector ( a piece xerox paper) on the opposite side to fill in the shadows. Now, the surface texture looks realistic.

02
02-IMG_2934-sponge_side_lit-jpg-acr-ps01a-01_698px_wide.jpg

BTW, both of the above photos were taken with my old iPhone, showing that you don't need a fancy camera to do this sort of photography. I didn't take any particular care to match the colors or brightness.

If you don't want to go to the trouble of making a lighting setup, but you have a flatbed scanner, you can use it instead of a camera to give good surface relief. It's not quite as good as a proper lighting setup, but it will certainly do the job:

03
03-scan73540-sponge-jpg-acr-ps01a-01_698px_wide.jpg

More later on how to postprocess such images.

Cheers,

Tom M
 

creeper

Member
Messages
13
Likes
1
That is very cool. thanks for the info and example. I have been working on it. and adjusting the levels and shadows/highlights. This is a very different point but better depths.
 

Attachments

  • project.png
    project.png
    650.5 KB · Views: 3

Tom Mann

Guru
Messages
7,223
Likes
4,343
I spent a bit of time trying to come up with at least a semi-automated method, and, to be honest, never got anything that looked as clean as the line art illustrations that were done by hand. I started with this:

arrowhead_example-tjm01_RH_sample-acr-ps02a_8bpc-00_just_ACR.jpg

And, the best I could do were things that looked vaguely like this:

arrowhead_example-tjm01_RH_sample-acr-ps02a_8bpc-01.jpg


This quest reminds me of all the methods that promise to automatically turn photos into "hand drawn art", but the automated methods are never even close to the real thing.

If you find an automated method that you like, I would love to hear about it.

Best regards,

Tom M
 

kerby

Banned
Messages
25
Likes
15
Hi creeper, just throwing a general tip out there: you can use Filter > Stylize > Wind and play with the settings to get shading strokes similar to hatching. Run the filter twice at a perpendicular angle to get a cross hatch.
 

thebestcpu

Guru
Messages
2,988
Likes
2,747
Hi Creeper

Using your last arrowhead image, the following was done with Smart Blur and Gaussian blur filters

John Wheeler

project-smart-blur-and-gauss-blur.jpg
 

Top