What's new
Photoshop Gurus Forum

Welcome to Photoshop Gurus forum. Register a free account today to become a member! It's completely free. Once signed in, you'll enjoy an ad-free experience and be able to participate on this site by adding your own topics and posts, as well as connect with other members through your own private inbox!

Can you help explain how to achieve this effect?


ASC

Well-Known Member
Messages
76
Likes
1
Hi guys,

Im a photographer and a slight newbie to photoshop. I know the basics etc but not to the level I'm about to explain...

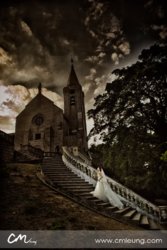
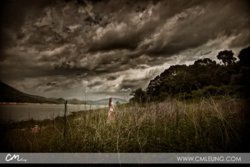
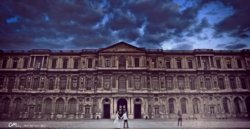
I want to start creating Fine Art with some of my pictures for example see the following pictures from CM photographer (all credits to him for these pictures his very talented)

9tpo8z.gif
27zz1gk.jpg

For the above images, I'm mainly concerned with the building and the effect/texture on them. You can see in the 1st picture how the building has a very grunge effect to it. with some dark/light patches. That is the first thing I wish to learn.

----------------------------------

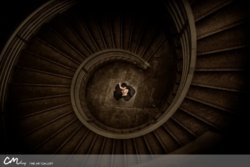
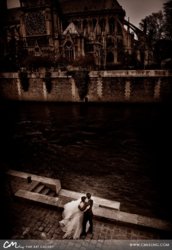
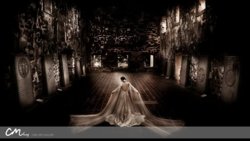
Secondly I would like to know how to create dark, low light grunge effect like this:
2nq8sno.jpg
20urfog.jpg
16hrx2g.jpg
2n16qnm.jpg
So as you can see in the images above the light is quite low, I'm guessing a lot of its done with Dodge/Burn tools... and overal hue to get that slight purple colour?

----------------------------------

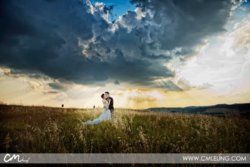
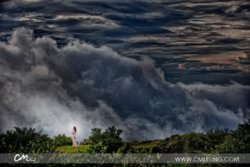
And thirdly how to make the clouds come alive in your pictures like this:
2mhd212.jpg
2mcuhj7.jpg
290wl82.jpg

----------------------------------

I know I'm asking a LOT with all them pictures, but I'm just posting them to help get my point across better so you guys can understand what effect I'm after. Now this photographer also sells actions to achieve some of these effects in photoshop if you go on his website (see image). But It doesn't say whether the action is applied step by step so we can learn what his doing or all at one go...

If anyone could help explain with demonstration on how to achieve any one of these effects or know of a good link/tutorial showing how to achieve them. I would be forever grateful!

Thanks for your time and I really hope someone can help me (and others that are looking for the same effect) out.

Thank You
 

Vafann

Guru
Messages
1,362
Likes
378
I would LOVE to know how to do that, but unfortunately I´m far from that level of experience. If I should come across any tutorials on how to do things like that, I will give you the links though. Really cool stuff! :)
 

fenix

Guru
Messages
563
Likes
179
For to achieve that feeling you go by the top menu: Image/Adjustments/HDR Toning. By playing with the sliders there you could achieve that crispy look. For to apply the the colors you just make a new layer on top of the photo. Set the blending mode to "Overlay" Chose a color and pick a brush and paint. Easiest is to chose one layer per color and then you could adjust the opacity on each and one of those layers until you´ll get it as you wish.
 

nataloran

Well-Known Member
Messages
118
Likes
27
Yes I agree with Fenix the easier is to paint brushes of dark points, then a new layer and the point of light like white brush, just gaussian blur all that and overlay. Then play with opacity to have the render you need. I would personally finish with a fill in layer to pack all this ;-) like a dark blue on exclusion ;-)

Hope it helps
 

ASC

Well-Known Member
Messages
76
Likes
1
I would LOVE to know how to do that, but unfortunately I´m far from that level of experience. If I should come across any tutorials on how to do things like that, I will give you the links though. Really cool stuff! :)

Thanks any tutorials at all would be awesome!

For to achieve that feeling you go by the top menu: Image/Adjustments/HDR Toning. By playing with the sliders there you could achieve that crispy look. For to apply the the colors you just make a new layer on top of the photo. Set the blending mode to "Overlay" Chose a color and pick a brush and paint. Easiest is to chose one layer per color and then you could adjust the opacity on each and one of those layers until you´ll get it as you wish.

I was thinking maybe its HDR especially for the first image. Do you my chance have any tutorials/links showing this in perhaps a demonstration video?

Yes I agree with Fenix the easier is to paint brushes of dark points, then a new layer and the point of light like white brush, just gaussian blur all that and overlay. Then play with opacity to have the render you need. I would personally finish with a fill in layer to pack all this ;-) like a dark blue on exclusion ;-)

Hope it helps

Thanks for your comment appreciate it. I will try this out but its kinda heard reading about something then trying it as opposed to actually watching a tutorials demonstration. Would you by any chance of any links...


I took few pictures of a similar type building (as picture 1) with my Canon 5D, just so I can practise the effect within Photoshop. If you guys like I can post the image here If you wish to create a tutorial on it and show how you might create a similar effect?

-ASC
 

nataloran

Well-Known Member
Messages
118
Likes
27
check lynda.com or youtube ;-) sure you will find some
 

Vafann

Guru
Messages
1,362
Likes
378
Thanks any tutorials at all would be awesome!


I was thinking maybe its HDR especially for the first image. Do you my chance have any tutorials/links showing this in perhaps a demonstration video?


Thanks for your comment appreciate it. I will try this out but its kinda heard reading about something then trying it as opposed to actually watching a tutorials demonstration. Would you by any chance of any links...


I took few pictures of a similar type building (as picture 1) with my Canon 5D, just so I can practise the effect within Photoshop. If you guys like I can post the image here If you wish to create a tutorial on it and show how you might create a similar effect?

-ASC

I think it would be really cool if you posted the image to try and practice on! :)
 

Boomawoom

Well-Known Member
Messages
105
Likes
39
I agree with what everyone else has been saying but I'd use the burn tool to darken the image instead of using a regular brush and overlay. You should play with the levels a bit to get a higher contrast and lower the saturation. Also the clouds are from a different image, you can tell on the last picture because there's a slight glow from the bushes. This is pretty advanced stuff so you should start with some beginner tutorials.
 

ASC

Well-Known Member
Messages
76
Likes
1
Boomawoom, thanks for your comment. I don't know if the clouds are from a different image or not. Only reason I say that is because of this video:

CM Actions on Vimeo

You get to see what the action's do, and as you can see in the 'BEFORE' images the clouds are already there in all of them its just a matter of enhancing them and making them 'pop' out.

@Vafann, I will post the image as soon as I get the camera back off a friend. Should be Thursday/Friday.
 

Boomawoom

Well-Known Member
Messages
105
Likes
39
Ah right, ok I was wrong :) and if it's all done by an action then I don't think they'll be any brush work either. Best thing I'd suggest is to look at some HDR tutorials and you could get a similar effect. There's a few here.
 

Boomawoom

Well-Known Member
Messages
105
Likes
39
If you're a photographer then you're better of leaning how to take HRD pictures on your camera since doing it in photoshop is just fake HDR. It's not too hard, all you have to do it take 3 photos with varying exposure's. I think it -2EV, 0EV and +2EV I did a bit on it in university last year :)
 

Hoogle

Guru
Messages
8,334
Likes
2,587
Have not read through all the comments but this has replacement parts in images but the jist of it is to look at HDR photography or cheat and use HDR toning and learn about split toning. Some of them are just sepia but lowered exposure on a duplicate layer then a layer mask applied to paint back in the original models so they are of normal colour.
 

Hoogle

Guru
Messages
8,334
Likes
2,587
Oh and yes I think it is a good idea to learn HDR photography to understand the principal but then it is so easy to fake you can use toning or you can open up an image and adjust the exposure 3 + times either by 1 stop or 2 and then merge the 3+ together. As you are a photographer I am assuming your using a DSLR which you will have a function called auto bracket some cameras require you to put your shutter release into burst mode but as you take 1 picture it will also take 2 different pictures adjusting the exposure for you. However most DSLRs will limit you to either 3 frames or 5 frames per bracket. But you rarely need anymore than that. I believe lynda.com do a good course on HDR Photography and processing in photoshop. look for a filter called HDR Effex pro very good filter.
 

ASC

Well-Known Member
Messages
76
Likes
1
Hey guys thank you all for your feedback/comments.

@Boomawoom, they might be come brush work using burn/dodge perhaps, or I'm guessing he creates the HDR image with a plug-in within Photoshop and masks out the couple/model so it doesn't affect them. Also I have a Canon 5D Mark II, and I know for a good HDR image you new 3-5 images of different stops as you mentioned. However in CM's photography this isn't always the case.

For example in the first image I posted the bride has thrown her veil so there's abit of motion happening in the picture. This obv can't be taken with various stops (due to shutter release etc, 'capturing the moment'). So I'm guessing his create most of his HDR images with 1 single image?

What Photoshop plug-in or other software would you guys recommend is best for creating HDR images like the one's I uploaded...?

Thanks again everyone!
 

ASC

Well-Known Member
Messages
76
Likes
1
Hey guys,

Just letting you know creativeLive have a HDR course on over this weekend: Dramatic Post-Production with David Nightingale.

Google creativeLive and on the website click 'live'. Don't want to post URL just incase i'm not allowed.

But I will be posting the image I was on about either tomorrow or day after...
 

qwerty123

Active Member
Messages
38
Likes
1
The above images have high contrast edges, so some sort of edge recognition filter or adjustment was used - High Pass filter and Shadow/Highlight or HDR Toning would be my prime suspects. Probably layer blending option sliders were used to apply just right range of values. I would use architectural shots to play with the above adjustments - as the result you may learn wider range of Photoshop skills then one particular effect. It is very unlikely that one action can do the whole trick for you, so you probably will not be able to avoid plain old layer masking.
 

ASC

Well-Known Member
Messages
76
Likes
1
Thanks for your comment qwerty123, I actually went out and took some architectural pictures. I will upload it here soon so you guys can give it a shot and show me to. And Ii'll give it a try to. Hopefully someone can get it very similar and share how they achieved it.
 

Top