It's very quite simple, so should be easy to follow.

I'll keep it simple while giving the best detail I can. Gonna label it in steps.
1. Open the photo of your dog in photoshop and duplicate the original layer so you have a background copy (We need the original doggy layer so don't do anything with it!) then mask the head out. You can do this using any method you'd like. Pen tool, lasso tool, heck even the eraser tool if you'd like and feel you can do a sufficient job !
Don't worry about trying to be careful about the edges of the fur, we'll get to that later (;
2. Go to google images, grab your camera or purchase a stock from any stock site of a flower that you would like to use. I just did a quick google search and found the one I used in the image I posted. Then you'll want to mask the flower out from it's background (Don't worry about duplicating here, we only need the flower) . Try to get it as clean as possible, this all just depends on how well you want your edges and realism to be in the final image.
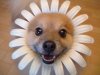
3. Position the flower layer behind the masked doggy head layer that you created earlier, being sure to keep your original doggy layer visible as well. This will put your doggy head above the flower, and leave the flower above your dog's body and everything else behind what you masked out in the duplicated doggy layer.
4. Here's the tricky part, but we're almost over so that's good! =D! Now what you'll need to do is grab your smudge tool, Liquify tool works as well, but I prefer smudge
. Keep your settings low, around 30-40 percent on the strength of your smudge tool. Then just start smudging outwards from the dogs fur so that it looks like there's fur coming off of it. There's other methods to do this that provide better results, but for simplicity reasons, we'll keep it at the smudge tool
.
That's basically it! It's just masking out the dog's head, masking out the flower, then putting the dog's head above the flower in the layer palette. The rest of your dog will stay behind the flower and dog head layer.
Then just smudge in the fur and you're good to go! You can add gradient maps, etc afterwards. You may also need to touch up the individual layers to get them looking more photorealistic if that's what you're going for. I added a brightness/contrast layer to all 3 layers in the image I posted earlier as I felt it made it pop more and not so be dull
. Just remember, your image will only be as good as the time and effort you put into it. Don't rush.
GOOD LUCK!