What's new
Photoshop Gurus Forum

Welcome to Photoshop Gurus forum. Register a free account today to become a member! It's completely free. Once signed in, you'll enjoy an ad-free experience and be able to participate on this site by adding your own topics and posts, as well as connect with other members through your own private inbox!

Multiple face effect


Mrinal Bhatt

Well-Known Member
Messages
51
Likes
3
Hello photoshop gurus..

A new challenge for me!!!
From my previous topic, I think I know a bit of how I can achieve this...but still need to need help with the hazy effects!
 

Attachments

  • avatars-000101921979-ff35kl-t500x500.jpg
    avatars-000101921979-ff35kl-t500x500.jpg
    35.5 KB · Views: 32

IamSam

Administrator
Staff member
Administrator
Messages
22,722
Likes
13,258
Hello Mrinal, would love to see your take on how to duplicate or double the face.

I think the hazy effect is nothing more than a blur.
 

IamSam

Administrator
Staff member
Administrator
Messages
22,722
Likes
13,258
Yep, that works. Very nice effect!


Here's my try at it........

Screen Shot 2014-11-07 at 8.17.55 PM.png

I tried to be more like the image in your first post.
 

IamSam

Administrator
Staff member
Administrator
Messages
22,722
Likes
13,258
I must work today, but I will make a short tutorial for you when I return home this evening.
 

IamSam

Administrator
Staff member
Administrator
Messages
22,722
Likes
13,258
OK let's see if I can make this easy to understand.

Open the original in Ps.
Duplicate the original.
Right click the Original layer and click Convert to a Smart Object.
Turn off the original layer.

Create a layer mask on the duplicate layer.
On the layer mask, use your Brush Tool to to isolate the head.

Screen Shot 2014-11-08 at 8.07.58 AM.png

Once done isolating the head, highlight the layer mask and right click, select apply layer mask.

Screen Shot 2014-11-08 at 8.08.34 AM.png

Turn the original layer back on.

Highlight the duplicate layer, reduce it's opacity to about 75%.
Hit Command/Control + T to enter free transform mode.
Move the head to where you like it.

Screen Shot 2014-11-08 at 8.14.06 AM.png

Turn the duplicate layer's opacity back to 100%
Right click the duplicate layer and Convert to a Smart Object.
On the duplicate layer, adjust the opacity to where you want it to be for the final image. I went to about 60%.

On the duplicate layer apply a new layer mask.
On the duplicate's layer mask, use your Brush Tool set to black to fade out the side of the face you don't want to show....
.....in my image it's the right side of the face.

Screen Shot 2014-11-08 at 8.13.03 PM.png

Screen Shot 2014-11-08 at 8.13.38 PM.png

Here is the reason why I used Smart Objects, we are going to add a blur. With SO, you can go back a readjust your blur at any time.

Highlight the Original layer, go to FILTER > BLUR > GAUSSIAN BLUR > set at about 15 pixels.

Repeat on the duplicate layer.
Highlight the duplicate layer, go to FILTER > BLUR > GAUSSIAN BLUR > set at about 15 pixels.

Screen Shot 2014-11-08 at 8.18.30 PM.png

Screen Shot 2014-11-08 at 8.18.44 PM.png

You can always go back and move the duplicate layer some more, add more or less blur........

Done.
 
Last edited:

IamSam

Administrator
Staff member
Administrator
Messages
22,722
Likes
13,258
I like this.......

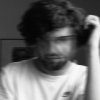
I used the Smart filter layer mask on the Original layer to give him one creepy clear eye..

Screen Shot 2014-11-08 at 8.22.58 PM.png
 

Mrinal Bhatt

Well-Known Member
Messages
51
Likes
3
OK let's see if I can make this easy to understand.

Open the original in Ps.
Duplicate the original.
Right click the Original layer and click Convert to a Smart Object.
Turn off the original layer.

Create a layer mask on the duplicate layer.
On the layer mask, use your Brush Tool to to isolate the head.

View attachment 50436

Once done isolating the head, highlight the layer mask and right click, select apply layer mask.

View attachment 50437

Turn the original layer back on.

Highlight the duplicate layer, reduce it's opacity to about 75%.
Hit Command/Control + T to enter free transform mode.
Move the head to where you like it.

View attachment 50438

Turn the duplicate layer's opacity back to 100%
Right click the duplicate layer and Convert to a Smart Object.
On the duplicate layer, adjust the opacity to where you want it to be for the final image. I went to about 60%.

On the duplicate layer apply a new layer mask.
On the duplicate's layer mask, use your Brush Tool set to black to fade out the side of the face you don't want to show....
.....in my image it's the right side of the face.

View attachment 50439

View attachment 50440

Here is the reason why I used Smart Objects, we are going to add a blur. With SO, you can go back a readjust your blur at any time.

Highlight the Original layer, go to FILTER > BLUR > GAUSSIAN BLUR > set at about 15 pixels.

Repeat on the duplicate layer.
Highlight the duplicate layer, go to FILTER > BLUR > GAUSSIAN BLUR > set at about 15 pixels.

View attachment 50441

View attachment 50442

You can always go back and move the duplicate layer some more, add more or less blur........

Done.

Will try soon and let u know!!!
 

Mrinal Bhatt

Well-Known Member
Messages
51
Likes
3
Heres my try..I tried the Gaussian blur but it would become too blury.....so this kind of seemed to work!
 

Attachments

  • 1fcd9b33-5aa6-4165-bc8e-5d9eef257fa0.png
    1fcd9b33-5aa6-4165-bc8e-5d9eef257fa0.png
    224.4 KB · Views: 7

Top