


Photoshop Tutorials
Starburst Effect
- filling layers and selections with color
- using menu commands to affect the entire document
- merging layers together
- applying special effect filters
- applying Layer Blend Modes to produce a specific effect
| Step 1 |
| Step 2 |
| Step 3 |
Method: Blast
Direction: From the Right
Apply the filter.
HINT PAUSE: If you experiment with the Wind filter, you'll notice that it reacts oppositely for black and white. We're using black, and so the wind direction is what the option shows - "from the right". If you used this option on a white filled area though, the effect would actually be the opposite - the "from the right" option would produce wind "from the left", instead. This isn't crucial to know here, but it IS something worth noting in general.
| Step 4 |
| Step 5 |
 Your image should now look somewhat like this one.
Now we'll apply the "Motion Blur" filter. Use these settings in the filter:
Angle: 0 (zero)
Distance: 200
Apply the filter.
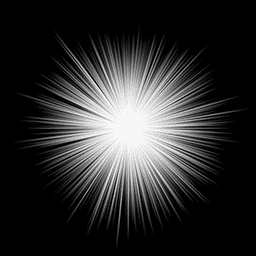
Your image should now look much smoother, and the spikes should be much more spread out across the canvas.
| Step 6 |
| Step 7 |
Open the filter and set it to "Rectangle to Polar". (in the Filter/Distort menu)
Apply the filter.
| Step 8 |
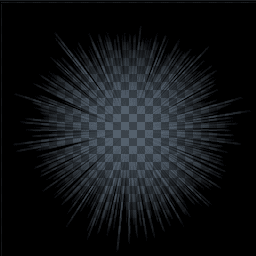 And now, to make our starburst effect easier to use within other images, and to manipulate in general, we're going to extract the transparent starburst area from the black surrounding it. To understand better what we're dealing with here, hide the background layer and you'll notice that our starburst effect is actually a transparent area, not color ( as seen here ). Make sure to unhide the background layer again!
 Ctrl/Cmd-Click the 'starburst' layer, then press Ctrl+Shift+I (MAC: Cmd+Shift+I) to invert the selection. Create a New Layer and fill the selection with white, then Deselect. Now fill the Background layer with black. And you can now delete the original black layer with the transparent starburst on it; the one we started with. You can now also give your new white starburst layer a proper name - "starburst".
T I P S
Here's just a few things you can do to tidy up the document, and enhance the effect a little more:
| Step 1 |
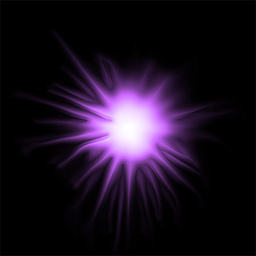
In the sample image at the top of this page, I used "Overlay", and a bright purple - R=153 G=51 B=255. Plus, I did the 3 "GURU TIPS" on the next page.
In the following steps we're going to enhance the effect.
| Step 2 |
| Step 3 |
| Step 4 |
I used these settings on mine:
Amount: 50%
Radius: 0.5
Threshold: 0
| Step 5 |
Now that your starburst image is on it's own layer, you can just open your other document, and drag the 'starburst' layer into it. Once on it's own new layer, move it's layer up or down in the layers palette to suit your purpose for it in your image. And you can now also Move the starburst anywhere you want within the new document.
Then to add some color to the effect, create a New Layer right above the 'starburst' layer. Ctrl/Cmd-click the starburst layer to select the starburst shape, then under the SELECT menu choose Modify/Expand. Expand the selection 2 pixels. Now fill it with the same color you're using for the document's background co lour. Then set the layer's Blend Mode to COLOR. And finally, link these 2 layers together; so they can be moved around together as one.
And that's it for my involvement in this effect!
It's now up to you to think of other ways to experiment with the it. I'm sure you'll find lots of other things to do for it.
Here's one example to get you going...
This was created by applying the FILTER>Stylize>Diffuse [Anisotropic] filter 10x ( a PS7 and up filter ). Interesting effect isn't it? Now it's your turn!
Have fun!
Copyright © Mark Anthony Larmand
For help, advice, tips and tricks, challenges, feel free to visit our![]()