Photoshop Tutorials
Selection Tools
PAGE 1 / 2
Learning to make various types of shapes using the selection tools is vital to getting the most from Photoshop, at a very basic level. In other words, you simply have to know how to do this stuff, before you can really become productive with the program, in any other way.
NOTE: Mac users The PC key "Ctrl" = the Mac key "Cmd". And the PC key "Alt" = the Mac key "Option".
NOTE: Mac users The PC key "Ctrl" = the Mac key "Cmd". And the PC key "Alt" = the Mac key "Option".
With Photoshop open, create a New Document (Ctrl/Cmd+N) using the default settings, except make it 200x200 pixels in size. The settings aren't important for this, so long as you choose RGB for the image mode.
Create a New Layer (Ctrl/Cmd+Shift+N).
We'll start with the selection tools as they appear in the toolbar:
(NOTE: we're leaving out the "Row" & "Column" selection tools because they're self-explanitory.)
Marquee selection tools:

Freeform selection tools:

Magic Wand
The Path Tools
All of these selection tools can be used to create some very complex selections, by adding, subtracting and intersecting basic selection shapes together. This is done in the following manner:
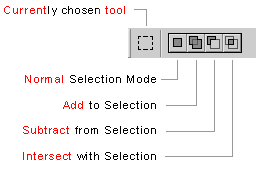 The following example explains this further. This is a segment of the Options Bar for the selection tools. When you choose a selection tool, this options bar appears along the top of the program work area (it's default location). Instead of using the keyboard quick-keys as explained above, you could just as well click on one of the buttons shown here to the right, to make the current selection tool perform the specific selection task you need.
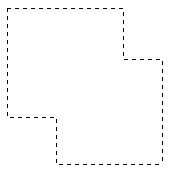 Choose the Rectangular Marquee Selection tool - here-after referred to as "the rectangle selection tool". Click and hold down your mouse button, while you drag your mouse across the canvas from top-left to bottom-right. Let go of the mouse when you see a rectangle shape created by the selection marquee. Now hold the Shift key down and draw another selection that goes beyond the borders of the current one. It can be anywhere on the canvas, or, also be a continuation of the first shape selection you created. Notice how the second selection gets added to the first? Try the same thing again, but this time use the Elliptical selection tool. And then try using the Lasso tool.
When you're done trying things out, press Ctrl/Cmd + D to Deselect. Or click anywhere on the canvas, outside of the selected area.
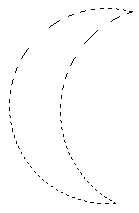 Choose the elliptical selection tool this time, and create a circular selection with it; it doesn't have to be a perfect circle. Now hold the Alt/Option key down and try creating a selection over top of the first one, that when subtracted from it will leave you with a crescent moon shaped selection. Like the example here.
As you may or may not be noticing by now, this can sometimes be a trying task. It's a very "hit-&-miss" kind of process, isn't it?
We'll find out a little later in the tutorials that this is a great reason for learning to use Channels. Solving this type of selection creating problem is the primary function of them - but we'll deal more with that later.
 Choose the rectangle selection tool and create a square in the middle of the canvas. Now choose the elliptical selection tool. Then, while holding the Ctrl/Cmd & Shift keys down at the same time, draw another selection. Start the circle selection right in the middle of the current square shaped selection. Drag the tool right and down, until you're outside of the edges of the square selection. Then release the mouse button. The shape you should end up with will look like the one here.
 This selection tool is very easy to both understand and use. Pick this tool now, and create a rough selection with it. Just start drawing on the canvas with it, as if it were a pencil. You can cross over your selection lines anywhere you want - just like with a pencil.
One thing to keep in mind when using this tool, is that if you release the mouse button before closing your selection, Photoshop will close it for you by drawing a straight line from the point you released the mouse, back to the point where you started your selection. This is generally not something you'd prefer to happen. To see what I mean, start drawing a circle, but stop when you're halfway done it. Then release the mouse button, and watch what happens to your selection line. The only way to properly close a selection with the Lasso tools is to manually connect the end of your selection to the start of the selection.
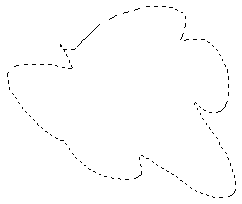
 Choose this tool. The selection shape example image here explains exactly what this tool is best used for. To use it, simply click the mouse once where you want to begin your selection. When you get to a point along the way where the selection needs to change direction, click the mouse again there. Continue clicking and dragging the mouse until you've created your complete selection shape. To close the selection, just click the tool over top of where the selection started.
Copyright © Mark Anthony Larmand
We'll start with the selection tools as they appear in the toolbar:
(NOTE: we're leaving out the "Row" & "Column" selection tools because they're self-explanitory.)
Marquee selection tools:

Freeform selection tools:

Magic Wand
The Path Tools
All of these selection tools can be used to create some very complex selections, by adding, subtracting and intersecting basic selection shapes together. This is done in the following manner:
- by holding down the Shift key to ADD to
- the Alt/Option key to SUBTRACT from
- and both of those keys at the same time, to INTERSECT two selections.
 The following example explains this further. This is a segment of the Options Bar for the selection tools. When you choose a selection tool, this options bar appears along the top of the program work area (it's default location). Instead of using the keyboard quick-keys as explained above, you could just as well click on one of the buttons shown here to the right, to make the current selection tool perform the specific selection task you need.
| Add to a selection |
 Choose the Rectangular Marquee Selection tool - here-after referred to as "the rectangle selection tool". Click and hold down your mouse button, while you drag your mouse across the canvas from top-left to bottom-right. Let go of the mouse when you see a rectangle shape created by the selection marquee. Now hold the Shift key down and draw another selection that goes beyond the borders of the current one. It can be anywhere on the canvas, or, also be a continuation of the first shape selection you created. Notice how the second selection gets added to the first? Try the same thing again, but this time use the Elliptical selection tool. And then try using the Lasso tool.
When you're done trying things out, press Ctrl/Cmd + D to Deselect. Or click anywhere on the canvas, outside of the selected area.
| Subtract from a selection |
 Choose the elliptical selection tool this time, and create a circular selection with it; it doesn't have to be a perfect circle. Now hold the Alt/Option key down and try creating a selection over top of the first one, that when subtracted from it will leave you with a crescent moon shaped selection. Like the example here.
 As you may or may not be noticing by now, this can sometimes be a trying task. It's a very "hit-&-miss" kind of process, isn't it?
We'll find out a little later in the tutorials that this is a great reason for learning to use Channels. Solving this type of selection creating problem is the primary function of them - but we'll deal more with that later.
| Intersect with a selection |
 Choose the rectangle selection tool and create a square in the middle of the canvas. Now choose the elliptical selection tool. Then, while holding the Ctrl/Cmd & Shift keys down at the same time, draw another selection. Start the circle selection right in the middle of the current square shaped selection. Drag the tool right and down, until you're outside of the edges of the square selection. Then release the mouse button. The shape you should end up with will look like the one here.
What you've done here is to intersect the square selection with a circular one. And that means that where ever the 2 selections overlap, is what will be left as a selection when you release the mouse button. This function has some very specific uses. But as you get better at using the program, you'll find reasons for using it more often.
| Lasso selection tool |
 This selection tool is very easy to both understand and use. Pick this tool now, and create a rough selection with it. Just start drawing on the canvas with it, as if it were a pencil. You can cross over your selection lines anywhere you want - just like with a pencil.
 One thing to keep in mind when using this tool, is that if you release the mouse button before closing your selection, Photoshop will close it for you by drawing a straight line from the point you released the mouse, back to the point where you started your selection. This is generally not something you'd prefer to happen. To see what I mean, start drawing a circle, but stop when you're halfway done it. Then release the mouse button, and watch what happens to your selection line. The only way to properly close a selection with the Lasso tools is to manually connect the end of your selection to the start of the selection.
| Polygonal lasso selection tool |
 Choose this tool. The selection shape example image here explains exactly what this tool is best used for. To use it, simply click the mouse once where you want to begin your selection. When you get to a point along the way where the selection needs to change direction, click the mouse again there. Continue clicking and dragging the mouse until you've created your complete selection shape. To close the selection, just click the tool over top of where the selection started.
PAGE 1 / 2
Copyright © Mark Anthony Larmand


