Photoshop Tutorials
Fill Tools
PAGE 1 / 2
Gradient presets
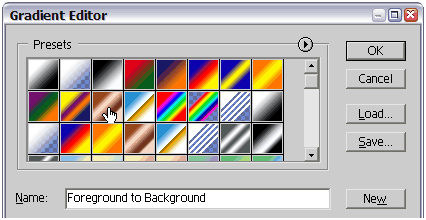
 This gradient library preset window will then open. It's divided into a couple of sections. At the top is your currently loaded gradient preset library. To use any specific preset, just click on it and press OK, or hit your Enter/Return key.
If you click the small arrow right above the scroll bar on the right, you'll open a menu of other options; such as Reloading and Replacing Presets, preview image size, a text only list, etc.
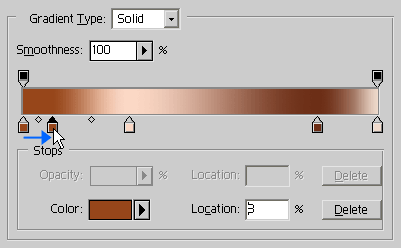
 Below the preset library window is the where all the fun takes place. This is the gradient editor.
It's very simple to use: to add new color tags to the gradient design, hold the Alt/Option key down while pressing and dragging to the right or left with your mouse (see blue arrow). This duplicates the color tag you dragged on. And to remove a color tag, just click on it and hold your mouse button down, then drag the tag up or downward, and away from the color strip area. The tag will just disappear. To edit a color within the design, double-click on the color tag you want to change, click on the small color swatch near the bottom of the editor window.
The small diamond shapes in between the color tags are location markers. Move them left or right to shift the colors around in the design.
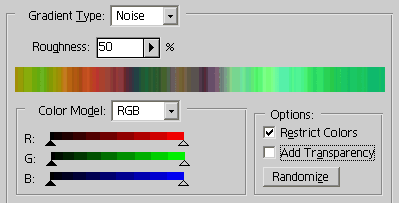
 This window to the right is a special kind of gradient style. It's called 'Noise'. You can choose it from within the "Gradient Type:" drop down menu. And the gradient design you see here is what a typical preset looks like for the style of gradient effect. It would be difficult to explain any specific situation where one might use this gradient effect. So fool around with it's settings and discover it's features on your own. This gradient effect is not talked about much by Photoshop users, but you'll see after some playing with it that it can be a very powerful tool in certain situations; the 'Add Transparency' setting can create some really nice effects! And there are no default presets saved for this style either. So you can create (and save!) your own custom library as you learn more about it.
 Have fun!
T I P When you're in the gradient editor, you can also select colors for your design by moving your mouse outside of the editor window, and over an open document or your color palette. Your mouse cursor will become an eye-dropper tool, and you can just click on any color you like to select it.
| Textures |
Create a New Document (Ctrl/Cmd+N). About 300x300 pixels will work fine for this. Once the document is created, create a New Layer (Ctrl/Cmd+Shift+N). Then fill the 'Background' layer with a Linear gradient going from top to bottom, dark blue to light blue; Foreground color dark blue, Background color light blue.
Grab the Elliptical selection tool. Then on the new layer you created, create a circular selection that takes up most of the canvas area. Now fill this selection with black.
Method 1: Using the Fill Command
Now to perform our basic texture fill, using the 'Fill...' command under the Edit menu. Open the EDIT menu now and choose 'Fill...'. When the dialog opens, open the 'Contents' drop down menu and choose 'Pattern'.
Just below that menu you should now see a preview image, with a down arrow beside it. Click on that small thumbnail image to open your Pattern library palette. At the top left of this library window you will see one of the default patterns - some blue bubbles. Double-click on that thumbnail, then click the OK button. As soon as you do, Photoshop will fill in your selection with that texture pattern. And that's all there is to that method.
T I P To create a perfect circle or square selection shape, hold down the Shift key while dragging the selection tool to be the size you want. When using the Polygon Lasso and Pen tools, doing this will force the selection marquee to create either a perfectly straight line, or a perfect 45 degree angle. And if you want your selection to be created from the center outward, hold down the Alt/Option key; both of keys can also be held at the same time. Try it!
Other Options: Before pressing the OK button to fill your shape with the texture, you can also effect the blend mode and texture opacity that will be applied to the pattern you're filling with. These options are located just below the preview thumbnail of the texture. The blend mode you choose here will function exactly the same as those used for the layers palette. The only difference is that the blend mode for that layer will stay set on Normal; but the blend effect will still be applied to the texture.
NOTE If you'd like to play with this right now, go through the previous steps to perform a texture fill for your selection. Try doing several fills, and changing these settings each time to understand exactly what effect they'll have. After each fill you do, just press the Delete key before trying another fill; to clear the fill you just did.
For this exercise, we'll use the document from the previous page. In the last exercise we saw how we could apply a fill to a selection. So for this one, we'll forget about creating a selection and just apply the fill to our entire layer. Before we begin, make sure that you're working on the new empty layer you've created.
Choose the Paint Bucket tool from the toolbar. When you do, you'll notice along the top of the work area that the Option bar for the tool appears. Containing all of the setting options you can apply to the tool.
Method 2: Using the Paint Bucket
Now to perform a slightly more precise kind of fill.
You should still have the same texture pattern chosen from the previous page; because Photoshop remembers the last pattern used. But let's go through the steps again to choose a pattern.
Look to the extreme left side of the Options bar along the top of your work area. You'll see the word "Fill:". Change the option in that menu to 'Pattern'. And beside that, where it says the word "Pattern:", open that menu and choose the same blue bubble image we chose before.
Now, if all you wanted was to fill a layer or selection with this pattern, you'd just click the Paint Bucket anywhere within the layer or selection. Go ahead and do that now. Click anywhere in the layer. As you can see, the entire layer was filled with the pattern. That's because A) the layer is completely empty, and B) you set no boundaries for the tool. Boundaries for the fill tools only apply when you either have an active selection going, or you're wanting to fill a specific area that is already filled with some color.
T I P Did you know?... That if you grabbed the corners of your document window and stretched it to be larger than your canvas, you could change the color of the area that surrounds your canvas? All you do is first, choose a color. Next, hold the Shift key down and click the Paint Bucket tool once in the space that surrounds your canvas; i.e. the area that is outside and beyond the canvas itself. This is especially useful for Web page design. Try it!
Now let's see how setting boundaries for this tool can change the way it behaves...
| Setting fill boundaries |
 Ok press Ctrl/Cmd+Z to Undo the fill you just did on the previous page.
 Now we'll apply a fill with the Paint Bucket, but we'll apply it within a specific colored area. Switch to the rectangular selection tool for a minute. Press the D key to reset the Fore- and Background swatches. Now create a new layer, then create a square selection and fill it with black. Now switch to a medium gray color, and create a long thin selection, like a stripe down the center area on the same layer, and right overtop of the black; dividing the black square completely into two sections. Switch back to the Paint Bucket tool again. Now before we do the fill, take a look at the right hand side of the Option bar.
Set your options up exactly as you see here. Then go ahead and click the Paint Bucket tool inside the left half of the black square. Notice how, even though the black is divided by the gray, the texture fills all of the black? Press Ctrl/Cmd+Z to Undo that last fill. Now click in the checkbox beside the word 'Contiguous'. And now click again inside the left half of the black square. The fill is now only applied to that specific area of black. That is what the 'Contiguous' option is for. And it's application (or behavior) applies to all tools in Photoshop that have this as an option. Now before we continue, untick the 'Contiguous' option.
Now lets step backward for a second and look at the "Tolerance" setting in this tool's Option bar.
We've seen how to apply a fill in the most general sense, but let's take a look at a more specific situation. The 'Tolerance' setting can control the fill limitations, by increasing or decreasing the number used in the setting. In the sample image above, 32 is a good default setting that can be used for a lot of general applications.
Decreasing the fill area: To decrease the area to be filled, even right down to one single color, the number setting needs to be very low, or even set to zero. Zero says 'fill just 1 specific color in the image' -- which will be whatever color you click the tool on in the image.
Increasing the fill area: A setting of 255, which is the maximum setting, says 'replace every color in the image with my new fill'. In a lot of cases, it's necessary to use trial and error to get the exact number setting needed that will fill a specific range of colors in your image. Start off by increasing (or decreasing) the number setting by 16 (eg. 16, 32, 48, 64, etc.), and continue this until your expected results are reached. If they are not, then repeat the process but use 8 instead of 16. And then if need be, increments of 4. By using these smaller number increments, you're telling the tool to be more precise about the range of colors it fills.
How the tool works: The tool will start by filling the exact color you click the tool on, then it will start to spread outward from there into the colors that are located next to the color you clicked on. It's effect will continue spreading outward until it fills every color (pixel) in the image. And this is all dependant on how low or high you set the 'Tolerance' to for the tool.
To test this, set the Tolerance to 255, then click the Paint Bucket on either black area of the test image. You should see the entire image get filled, and not just the black or gray area. This effect also applies to filling with textures.
T I P The Anti-aliased setting only needs to be ticked ON if you're trying to fill an area that has curved edges. If, as in our test image above, you're only filling an area with straight edges, then it's best to untick this option to get the cleanest results. And this applies to all tools that have this as an option.
Using the "All Layers" setting...
This setting basically tells Photoshop whether or not you wish it to apply this fill to all the layers in your document, or only to the active layer you're working on. If you put a tick in this checkbox, and you click on a black area in your image, then the new fill color/texture will be applied to every black pixel within your image, all with one click. It goes without saying that this is a very useful setting.
Using the "Mode" and "Opacity" settings...
These settings are exactly the same as the ones located at the top of the layers palette. Changing the Mode will cause the fill to be applied using the blending effect of whichever Mode is chosen -- try using it and see! The Opacity is obvious; I'm sure you know what changing that will do.
Copyright © Mark Anthony Larmand
For help, advice, tips and tricks, challenges, feel free to visit our
PAGE 1 / 2


