


Photoshop Tutorials
Layer Masks and Clipping Groups
Note: if you'd like to actually try this yourself (you don't have to), then right-click all of the Sample images I show you and save them to your computer. Then open them into Photoshop before you begin.
I'm going to present you with a problem image here, and I want you to think about how you can achieve the desired goal -which is:
I want to create a 'composite' image effect, by combining elements from two separate images/photos together into one image.
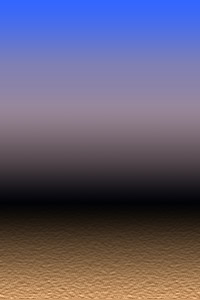
Sample 1 is my nice new textured gradient background I've created. I want to use it as the background for my final 'composited' image:
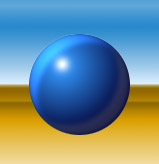
Sample 2 is an image that has two basic elements in it - a simulated chrome gradient background, and a shiny blue ball in the foreground:
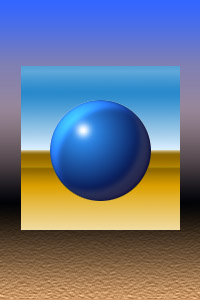
Here's our problem: I ONLY want to use the shiny ball from the second image, and not the chrome gradient background it contains. I want to 'composite' just the shiny ball into my new background image instead (Sample 1).
What I want from you here is to think about HOW you would go about solving this problem.
If you like, you can do these steps as I mention them.
 So first, I will open my 'new background' image (Sample 1 on previous page) into Photoshop. Then, I'll open the 'shiny ball' image (Sample 2 on previous page). Then I'll pick the MOVE tool, and drag the 'shiny ball' image into my 'new background' document; with the move tool selected, just click on the 'shiny ball' image and hold the mouse button down, while dragging the image into the other image document. The 'shiny ball' image will be automatically given its own layer, and now I can start to work on how I will 'isolate' just the shiny ball within its original image. So in other words, I have to 'hide' the chrome gradient background, and leave just the ball visible on the layer.
BUT... I don't want to destroy (destructively edit) my 'shiny ball' image - it must remain in its original form; i.e. You can't 'cut' the ball from the original image in any way.
(Pretend here that the shiny ball image is actually a more complex image, such as a photo. And the ball is actually a person or other object)
T I P
First, you have to understand what the problem is.
Second, you have to know, or be able to visualize, what tool(s) Photoshop has that will help you solve the problem.
Third, you collect your source images into Photoshop, and you attack the problem.
 The scenario I've given you here so far is "the concept" of "what" Masks are used for. This scenario is a very common one when using Photoshop. You'll find that the better you get at the program, the more complex you'll like your artwork to be. And to get to that level, you'll need to be familiar with not only Layer Masks, but Clipping Groups also. (We'll get more into that later)
Ok, let's go over the method of creating a Layer Mask
There are only 2 steps needed to create a Mask:
1) Create your selection
2) Fill it with the appropriate color
When you "Add a Layer Mask" to a layer, Adobe would tell you to use the Eraser tool within the mask to remove areas from the image on the layer.
NOTE Adobe uses that method (tool) simply to get you to understand what is happening on the layer mask to create the effect that a layer mask produces.
It might help for you to learn now, that the term 'Mask' can also mean 'protect' - depending on the current state/function of the mask. If you were working with a 'Quick Mask' for instance, then the function of the mask would be to 'protect' specific areas of an image; from certain actions, like filters, commands, manual editing tools, etc. In our case for this exercise however, Mask means to 'hide' (& reveal) specific areas of a layer. As you learn more about Masks, you'll come to know that you can actually just use the Airbrush tool for this purpose - and it's quicker than using the Eraser. You'll also come to learn that Layer Masks can contain 256 shades of gray, including black and white. So that means you can apply any type of gradient fill to them also. This is a powerful way to produce complex composite effects (one image created from many).
All you have to do is switch up your Foreground color to do each:
- Black = hide (mask)
- White = show (unmask).
And finally, there's two other things about Layer Masks that you need to know...
1) Once you've added a mask to a layer, you'll notice that a small chain link appears between the layer image thumbnail and the mask itself. What that is for is to 'link' the mask to the layer contents. If you drag the layer contents around on the canvas with the link turned ON, then the mask will follow. That keeps the masked out area of the layer consistent with the image/object it was created for. That is SO cool!
If you click on that chain link it will disconnect the layer from the mask. If you then dragged the layer contents around, the mask will NOT follow it, and will instead remain fixed in the position it was originally created; or the last position you moved it to.
This function can serve any number of purposes in relation to the types of compositing effects you can achieve. I suggest you play with that a bit to get more of an understanding of how it can be used.
2) Once you've created your Layer Mask, you can then apply certain types of filters to it to create an even greater range of composite effects.
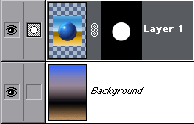
NOTE Whenever you create or work on a layer mask, you'll need to click back on the name of the layer you wish to work on. Creating a layer mask automatically selects the mask 'sub layer' - you'll see the layer mask icon become outlined, indicating it it selected and active. After creating a layer mask, if you apply a filter without clicking back on a layer, the filter will be applied to the mask and not the layer content.
Try playing with some of Photoshop's 'native' filters once you have a mask created. The popular 'Vignette' (faded edges) effect is created by simply applying a Gaussian blur to a Layer Mask made in the shape of a circle or square. Try that too!
Examples of filtered layer masks
T I P S
So far as Layer Masks go, that's basically all you need to know to get you started in understanding and using them. If you're trying to solve our earlier problem with the sample images, you can go ahead now and start applying the Layer Mask method at this point. Review this page if you're unsure where to start with creating your mask.
Next, we'll go over Clipping Groups and how the same problem can be solved using that method instead of a Layer Mask.
To use the Clipping Group method to hide/reveal parts of an image or areas of a layer, there are just 3 steps needed - 2 of which are the same as for creating a Mask.
The power of using clipping groups is that you can group together any number of layers, simply by repeating the grouping procedure explained above. The one thing to note here though is that layers that are clipped together must be 'stacked' on top of each other consecutively, with the color filled shape/object being the bottom-most layer - the 'clipping/masking' layer. If you like, you can also think of a clipping mask layer as a 'template' layer. You can not split up a group by inserting a non-clipped layer between any of the grouped layers.
Another thing to note is that the bottom layer in the group is the one you would change the layer's Blend Mode of. By setting the 'clipping mask' layer to Hard Light for instance, all of the above layers in the group will then be given that same Blend Mode. But, you can also at the same time change the Blend Mode for each separate layer if you wish - to produce an even more complex blend against all of the layers that are below the main 'clipping mask' layer. Experiment with this to get a better understanding of the effects that can be achieved. Just try using 3 or 4 stock photos for this and you'll see the effects I'm talking about.
And that about covers it folks! For now anyway... I hope this helps get you started to a better understanding of the powerful tools you have at your disposal with Photoshop. Remember... EXPERIMENT! EXPERIMENT! EXPERIMENT! Never get dismayed or upset when you try things, you're just learning! And soon enough you'll have the abilities to create the wonderful masterpieces you're envisioning in your head right now.
T I P To make information easier to remember and comprehend, once you've gone through it a few times, pretend that you are showing someone else how to do the techniques, and you are giving them the steps they need to learn what you've learned. Take care and have fun!
Copyright © Mark Anthony Larmand
For help, advice, tips and tricks, challenges, feel free to visit our
| The problem |
I want to create a 'composite' image effect, by combining elements from two separate images/photos together into one image.
Sample 1 is my nice new textured gradient background I've created. I want to use it as the background for my final 'composited' image:
Sample 2 is an image that has two basic elements in it - a simulated chrome gradient background, and a shiny blue ball in the foreground:
Here's our problem: I ONLY want to use the shiny ball from the second image, and not the chrome gradient background it contains. I want to 'composite' just the shiny ball into my new background image instead (Sample 1).
What I want from you here is to think about HOW you would go about solving this problem.
| Solving the problem using a layer mask |
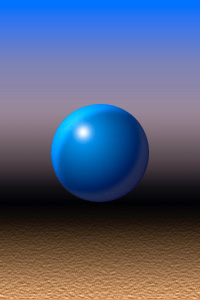
So first, I will open my 'new background' image (Sample 1 on previous page) into Photoshop. Then, I'll open the 'shiny ball' image (Sample 2 on previous page). Then I'll pick the MOVE tool, and drag the 'shiny ball' image into my 'new background' document; with the move tool selected, just click on the 'shiny ball' image and hold the mouse button down, while dragging the image into the other image document. The 'shiny ball' image will be automatically given its own layer, and now I can start to work on how I will 'isolate' just the shiny ball within its original image. So in other words, I have to 'hide' the chrome gradient background, and leave just the ball visible on the layer.BUT... I don't want to destroy (destructively edit) my 'shiny ball' image - it must remain in its original form; i.e. You can't 'cut' the ball from the original image in any way.
(Pretend here that the shiny ball image is actually a more complex image, such as a photo. And the ball is actually a person or other object)
T I P
First, you have to understand what the problem is.
Second, you have to know, or be able to visualize, what tool(s) Photoshop has that will help you solve the problem.
Third, you collect your source images into Photoshop, and you attack the problem.
The scenario I've given you here so far is "the concept" of "what" Masks are used for. This scenario is a very common one when using Photoshop. You'll find that the better you get at the program, the more complex you'll like your artwork to be. And to get to that level, you'll need to be familiar with not only Layer Masks, but Clipping Groups also. (We'll get more into that later)Ok, let's go over the method of creating a Layer Mask
There are only 2 steps needed to create a Mask:
1) Create your selection
2) Fill it with the appropriate color
When you "Add a Layer Mask" to a layer, Adobe would tell you to use the Eraser tool within the mask to remove areas from the image on the layer.
NOTE Adobe uses that method (tool) simply to get you to understand what is happening on the layer mask to create the effect that a layer mask produces.
It might help for you to learn now, that the term 'Mask' can also mean 'protect' - depending on the current state/function of the mask. If you were working with a 'Quick Mask' for instance, then the function of the mask would be to 'protect' specific areas of an image; from certain actions, like filters, commands, manual editing tools, etc. In our case for this exercise however, Mask means to 'hide' (& reveal) specific areas of a layer. As you learn more about Masks, you'll come to know that you can actually just use the Airbrush tool for this purpose - and it's quicker than using the Eraser. You'll also come to learn that Layer Masks can contain 256 shades of gray, including black and white. So that means you can apply any type of gradient fill to them also. This is a powerful way to produce complex composite effects (one image created from many).
 To "paint areas out" of an image/photo (mask/hide them) you'd paint with Black in the Layer Mask. Black will 'mask out' anything on the active layer, thus revealing the contents of the underlying layers. (in the example I gave you earlier, you would want to paint black over the chrome gradient area, of the shiny ball image)
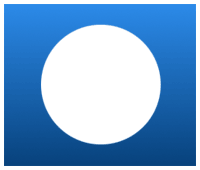
- To "paint areas back in" to an image/photo (unmask/reveal them) you'd paint with White. White will 'unmask' anything on the active layer, thus covering the contents of the underlying layers. - white is the 'default' color of a Layer Mask. (in the sample I gave you earlier, you would want to leave the white over the shiny blue ball; as in the image above)
All you have to do is switch up your Foreground color to do each:
- Black = hide (mask)
- White = show (unmask).
And finally, there's two other things about Layer Masks that you need to know...
1) Once you've added a mask to a layer, you'll notice that a small chain link appears between the layer image thumbnail and the mask itself. What that is for is to 'link' the mask to the layer contents. If you drag the layer contents around on the canvas with the link turned ON, then the mask will follow. That keeps the masked out area of the layer consistent with the image/object it was created for. That is SO cool!
If you click on that chain link it will disconnect the layer from the mask. If you then dragged the layer contents around, the mask will NOT follow it, and will instead remain fixed in the position it was originally created; or the last position you moved it to.
This function can serve any number of purposes in relation to the types of compositing effects you can achieve. I suggest you play with that a bit to get more of an understanding of how it can be used.
2) Once you've created your Layer Mask, you can then apply certain types of filters to it to create an even greater range of composite effects.
NOTE Whenever you create or work on a layer mask, you'll need to click back on the name of the layer you wish to work on. Creating a layer mask automatically selects the mask 'sub layer' - you'll see the layer mask icon become outlined, indicating it it selected and active. After creating a layer mask, if you apply a filter without clicking back on a layer, the filter will be applied to the mask and not the layer content.
Try playing with some of Photoshop's 'native' filters once you have a mask created. The popular 'Vignette' (faded edges) effect is created by simply applying a Gaussian blur to a Layer Mask made in the shape of a circle or square. Try that too!
Examples of filtered layer masks
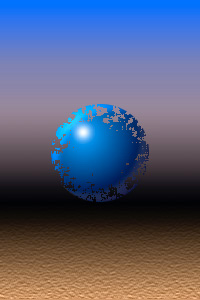
Spatter filter used on mask |
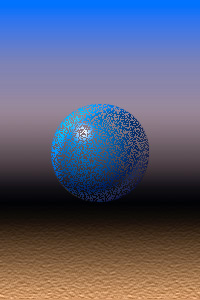
Noise filter used on mask |
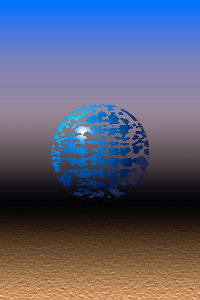
Craquelure filter used on mask |
 |
 |
 |
T I P S
- To make it easier when trying to work on or create any type of layer mask, you can isolate just the mask sub layer and make it the only thing visible. This will allow you to better see the effect any filters might be having on the mask. To do this, just hold down the ALT/Option key, and click on the layer mask icon. Click on it again to unhide your layers.
- You can hide a layer mask and temporarily remove any effect it's creating on a layer. Do this by holding the SHIFT key and clicking on the layer mask. Shift-Click on it again to turn the layer mask back on.
So far as Layer Masks go, that's basically all you need to know to get you started in understanding and using them. If you're trying to solve our earlier problem with the sample images, you can go ahead now and start applying the Layer Mask method at this point. Review this page if you're unsure where to start with creating your mask.
Next, we'll go over Clipping Groups and how the same problem can be solved using that method instead of a Layer Mask.
| Solving the problem using a clipping group |
    |
- a) Create a selection on your layer for the areas, or parts of an image, that you want to remain visible. You can use any method of creating a selection for this. OR...
b) Use any of the Painting tools to draw or paint a shape that you want to be used as a Mask. (go right to step 3 below, if you use this method) - Fill the selection you've made with black, white or a shade of gray; each color tone can have a different effect on the underlying layer when specific Blend Modes are applied to that layer - generally though I use a 50 percent neutral gray; it's the most versatile.
- (This is where most people go wrong)
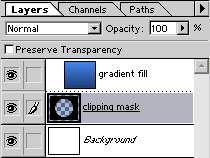
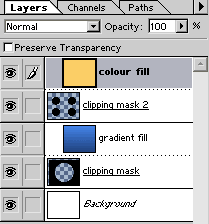
Make sure the layer you've created in steps 1 & 2 is directly below your "target" layer - the one you want to clip it to (apply the Mask to). Then, hold down your ALT key (Macs: Option key), and click the mouse on the thin line between the two layers. It will become a dotted line at that point, thus indicating to you that the two layers are now "clipped" together as a "group"; get it? - clipping group!
The clipping masks shown in the these sample images, would produce the effects shown here, when 'clipped' to the gradient and colored layers above them. Please examine the layers in the images if you're at all confused.
The power of using clipping groups is that you can group together any number of layers, simply by repeating the grouping procedure explained above. The one thing to note here though is that layers that are clipped together must be 'stacked' on top of each other consecutively, with the color filled shape/object being the bottom-most layer - the 'clipping/masking' layer. If you like, you can also think of a clipping mask layer as a 'template' layer. You can not split up a group by inserting a non-clipped layer between any of the grouped layers.
Another thing to note is that the bottom layer in the group is the one you would change the layer's Blend Mode of. By setting the 'clipping mask' layer to Hard Light for instance, all of the above layers in the group will then be given that same Blend Mode. But, you can also at the same time change the Blend Mode for each separate layer if you wish - to produce an even more complex blend against all of the layers that are below the main 'clipping mask' layer. Experiment with this to get a better understanding of the effects that can be achieved. Just try using 3 or 4 stock photos for this and you'll see the effects I'm talking about.
And that about covers it folks! For now anyway... I hope this helps get you started to a better understanding of the powerful tools you have at your disposal with Photoshop. Remember... EXPERIMENT! EXPERIMENT! EXPERIMENT! Never get dismayed or upset when you try things, you're just learning! And soon enough you'll have the abilities to create the wonderful masterpieces you're envisioning in your head right now.
T I P To make information easier to remember and comprehend, once you've gone through it a few times, pretend that you are showing someone else how to do the techniques, and you are giving them the steps they need to learn what you've learned. Take care and have fun!
Copyright © Mark Anthony Larmand
For help, advice, tips and tricks, challenges, feel free to visit our