


Photoshop Tutorials
Circular Text and Text on a Path
PAGE 1 / 2
| Step 5 |
Note to Mac users: The PC key Ctrl = the Mac key Cmd. And the PC key Alt = the Mac key Option.
Part 2: Completing the circle.
Ok so now... you should have your semi-circle of text you created in Part 1... right? Good! Now what if you have more text than can fit in a half-circle, or you need to make your text go further around the circle than just halfway? Well, that's actually much easier done than you might think. Here's how...
| Step 6 - A repeating text loop |
| Step 7 |
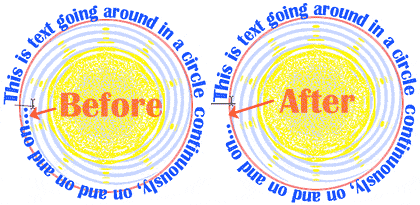
If on the other hand you have a long string of text, and you'd like it to go around a circle in a continuous line, like in the header image at the top of this page, then do the procedure from Step 2 to get a complete circle of text. Then use the Type tool and replace the duplicate text with the text that is to be continued from the first line.
T I P: As soon as you go to type the 2nd line of text in the lower semi-circle, you'll immediately notice that the semi-circle effect gets very small. This is a natural effect of the warp text filter. And if you don't have enough text to go completely around the circle, like in the header image above, then you'll need to employ a little trickery to force your text to fit the diameter of your circle. To do that, just put the type cursor at the end of your text line, and hit the space bar repeatedly until the 2nd line of text widens, and matches the diameter of your circle. Pretty simple solution huh?!
| Step 8 |
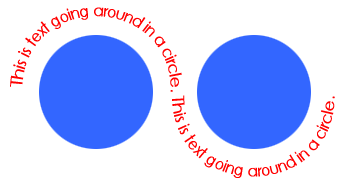 Other Special Effects:>
And now that we've covered the basic effects... here's just one example of a special effect you can do, by simply using Part 1 of this tutorial -- I call this a 'snake' effect. The text effect seen here was created by merely duplicating the first type layer, then re-opening the 'Warp Text' filter, and dragging the Bend slider over to -100%. That made my arc effect go down instead of up. And then I moved the duplicate text over so that it's first word lined up with the last word from the first text layer -- as if the text was typed in a continuous line.
I invite you now to try and come up with your own combinations, and see what special type path effects you can create. Good luck!
T I P
Don't be afraid to play with all the Type settings and also the 'Warp Text' filter effects too. Use your imagination and come up with as many new and interesting type path effects as you can. For those of you that don't have an illustration program to create these effects in, this is your chance to make the best of it just using Photoshop. A little creativity can go a long way with this effect. So EXPERIMENT!
Have fun!
Copyright © Mark Anthony Larmand
For help, advice, tips and tricks, challenges, feel free to visit our
PAGE 1 / 2