


Photoshop Tutorials
Face Makeover
 NOTE It should be stated now that the following procedures do not 'specifically' deal with correcting blemished skin, or otherwise 'repairing' a photo. Everything done in the photo retouching effect seen here was simply painted on. Then specific "Blend Modes" were used to create a "beauty makeover" type of effect.
The exception though is the method used to smooth & balance out the skin tone/texture. That was done using the "Median" filter, and masking.
The general 'makeover' process is quite simple, and can be done in a matter of minutes.
Topics covered here are:
- Smoothing & balancing complexion
- changing/enhancing eye color
- highlighting/brightening the eyes
- adding makeup
- changing/enhancing hair color
Note to Mac users: The PC key Ctrl = the Mac key Cmd.
And the PC key Alt = the Mac key Option.
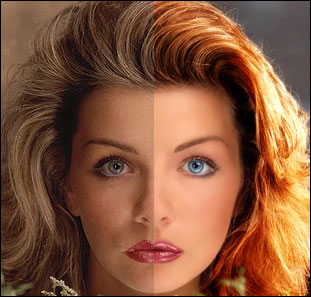
| Photo Makeover - a full comparison |

As evidenced by the original photo, there were a large number of issues to deal with in making over this subject. The most concerning was the irregularity of the light & shadow on her face, specifically down her right side (our left).
Here's a list of the problems, and the modifications made:
- First and foremost was the skin tone/texture. Smoothed it out a lot, and balanced the lighting.
- Softened the hot spots along the nose and on the chin, so those features wouldn't protrude so much.
- Hair color was dull and lifeless. I chose fire like red to offset the cool eyes.
- Eye color was also dull and lifeless. Fixed those too.
- Eyes whites were reddish brown and veiny. Brightened them up considerably.
- Eye lashes were uneven and a little thin. Balanced them out.
- Eye brows were also uneven and needed to be trimmed back to balance face better. Did that.
- Lips were lopsided, and the color was weak. Evened them, and added lip liner to enhance their shape.
- Pear shape of face was too strong. Applied rouge along the cheeks and down the sides to the jaw line, to help lengthen the face and broaden the forehead.
- Although I REALLY wanted to give her a little reconstructive surgery, I resisted. The only thing I felt I really had to fix was her fulcrum. It was crooked, and I straightened it out.
Bear in mind that this 'version' is but one of the many various ways this subject could've been 'made over'. My interpretation is not the end-all-be-all. If trying this for yourself, find ways to be original if at all possible. It should also be stated that I would not normally 'wax out' a person's skin tone like this. I was only showing the extreme to make a point. The 'synthetic look' does have it's place, but it's not used that often in the real world.
| Step 1 - Smoothing Skin tone & Texture |
 Duplicate the original photo layer, and apply the FILTER/Noise/Median... filter.
The setting should be somewhere between 5 and 10. As reference, look at the split image above... I used a setting of 8 for that. The exact amount is highly dependant on the quality of the original skin tone/texture. Generally, we want to balance out the shades in the skin color Blending them together, but not washing them completely out.
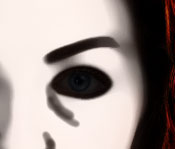
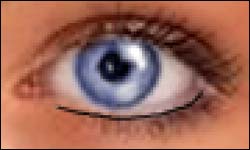
Add a Layer Mask, and using black, paint overtop of the main facial lines, and the entire eyeball area, including the eyebrows. Use a small soft brush for this and try to paint only where you need to. In most cases, the layer mask doesn't have to be too perfect, but don't be too sloppy either. If the subject's skin texture is very strong, then a more precise and detailed mask may be required.
The example image here shows where the Layer Mask is painted on, so you can better see how it fits over the facial areas.
Reduce the Opacity of this layer to somewhere between 50-70%; depending on how strong or subtle an effect you want. The choice is yours, because this setting amount is also dependant on the quality of the original skin tone/texture. So use your own judgment here, based on your photo.
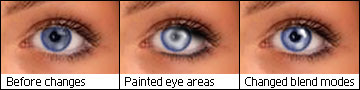
| Step 2 - Changing & Brightening the Iris Color |
 New Layer.
Use a hard brush that's the exact same size as the iris, and paint with the desired color over top of the original iris. Set the blend mode to Hue/Soft Light/Overlay. Your choice. The blend mode choice is affected by how light/dark your replacement color is. Layer Opacity can also be lowered to make the effect more subtle. In my header image, I used 'Hue' blend mode.
| Step 3 - Eye whitened to remove reddish-brown vein coloration |
 Select the white of the eyeball; either using Quick Mask or the selection tools. Add a HUE&SAT Adjustment Layer right above the smoothed duplicate layer. Lower the Saturation and raise the Brightness until the white looks 'almost' white. Don't go too pure white, or it'll look real fake. Click the Layer Mask for the Adjustment layer, and apply the 'Blur More' filter 2x -- to soften the edges a bit, and blend this new white area into the outer edges of the eyeball.
| Step 4 - Eyeball highlights and shadows added for clarity and depth |
 New Layer.
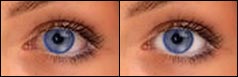
Paint an irregular shaped spot of white over the place where you want the eye highlight to be ( we're doing the small bright spot of white right now ). Usually, most photos will have one already, so add to it with this fresh bright highlight, over top of the original one. Just to liven it up. As you can see, the specular highlight in the original photo I used was very faint.
New Layer. Paint with a small soft brush using black, along the underside of where the eyelid is. Right over the topmost inner edge of the eyeball itself. This adds more depth. Set the blend mode to Soften, or leave it on Normal and lower the Opacity. This should be a very subtle effect.
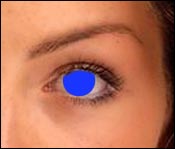
New Layer. Paint with a small soft brush using white, around the inner area of the iris. You don't have to paint over the entire area as I did. A smaller brightened area is also effective looking too. This choice is yours to decide.
Note: Do not just fill the entire iris area with a full-on solid white circle. Not only will it look real bad, but it'll not look natural either. This is one of those 'extras' that needs to be 'not-so-perfect' looking. Study the middle image in the above examples.
 This next part is optional. It's dependant on your intent for your photo, and whether it's even needed.
New Layer. Zoom into the lower eye area several hundred percent. We need to see the lower eyelash area real well. Paint with a 1 pixel brush using black, along the top edge of the lower eye lashes. We're adding a thin pencil line of eye-liner. Then use the Blur tool (R key) and run it across this line once or twice. Don't blur it right out, just soften it up a little. Adding this eyeliner helps to frame and present the eyes better. It'll make them stand out more.
| Step 5 - Makeup and hair color -- always a nice touch |
 New Layer.
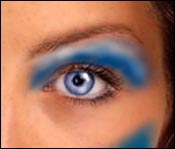
Look at the image to the right as a guide. Use whatever color you want, and paint a fresh coat of makeup onto the eyelids, and where ever else you like. I also painted on a line of highlighter too, along the top of the eyelid just below the eyebrow.
Then choose a suitable layer blend mode to use. I used 'Soft Light' for my image. Try a number of them though, as they all produce very specific looks/effects.
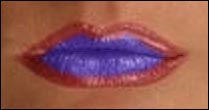 Even though we never directly covered the lip & hair areas, the same methods apply to those as we just used to add makeup to the face. Lipstick is a 'makeup' too. So just paint it on as well, and set the blend mode appropriately. I've found that reducing the layer's Opacity also works well for lips. This example image shows here I started painting purple over the original red. My blend mode was 'Hue', and the Opacity of the layer was 100% -- 50% looked good too. Use these settings as a starting point.
And as for hair... it's the same all over again. New Layer, mask out the hair, choose your new color(s), then paint over the original hair areas you wish to recolor, set the Blend Mode to Hue, Color, Soft Light, or Overlay. Or, try one of the other modes for a special effects.
And the tip for hair is... to darken certain areas, paint with black on a new layer and set it to Soft Light. Do the same to lighten the hair, but paint with white instead.
I'm no makeup expert, so the rest of this part I'm leaving up to your own good judgment.
Hope this info was helpful to those looking for it.
If you have any questions/problems regarding this tutorial, feel free to ask about them in the Forum.
Have fun experimenting!
Copyright © Mark Anthony Larmand
For help, advice, tips and tricks, challenges, feel free to visit our