


Photoshop Tutorials
Transparent Gifs
Ok lets start by creating a New Document (Ctrl/Cmd+N). The dimensions will be 350x200 pixels, and with a White Background.
Since version 5.5, Photoshop has had some very useful Web image creating features. But one of the best changes I like is the simplified method of creating transparency in an image destined for a Web page. Now, unlike in older versions, we use the "Save For Web..." option, found under the FILE menu. And as we'll see, this new-found power and flexibility is a real time saver too.
Because this whole procedure has become much more simplified, it'll only take a small demonstration here to show you the steps to use to create this effect. Here's just how simple it can be:
1) Create a New Layer for your document. Then use the Airbrush, or even the Type tool to add a simple image to this layer. Just do a couple of brush strokes or something, nothing fancy.
2) Now click the eye icon beside the document's "Background" layer to make it invisible. All you want showing is the simple image you created on that new layer, against the transparent checkered canvas background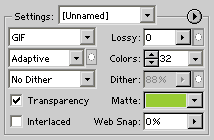 .
.
3) Open the FILE menu now and choose the "Save For Web..." option. When the export settings window opens, the first thing you check is whether the "Transparency" checkbox has a tick in it; if it doesn't, then click it to turn it on.
4) Beside the "Transparency" checkbox, there's a drop down menu named "Matte". This is where you set what color you'd like to use to surround the extreme edges of your image. This color should generally be the same as the one you'll use on your Web page. The Matte color will help smooth the edges of the image so it blends perfectly into your page's background color
5) Use the preview window to see exactly how your image will look once saved. Once you've decided what optimization settings you want to use, click OK to finish saving the image. And that's all there is to it!
That was unbelievably easy wasn't it? Much less time and steps spent to create this effect than in older versions. As a Web Designer I sure am glad Adobe added this new functionality to Photoshop. Now here's a couple of things to take note of when creating image transparency...

 T I P 1 Checkout the brownish outline (also known as a halo) around this first image (on the left). That color is the same as the one that would be used as my Web page background color So using the same color for the "Matte" option makes perfect sense in this case. And now, look at the image right beside it. That is the same image, with transparency, but I selected "None" for the "Matte" option.
What this means exactly is that Photoshop can remove absolutely ALL of the edge color used to blend an image into a background color But doing this is not usually preferable. Can you see how it has left the image's edges looking very harsh and unsmooth? Very jagged looking without the edge color to blend it into the background The first example will blend perfectly - see the top image below in number 2
T I P 2 If you intend on using the Layer Blend Modes for specific types of color blending effects (as in the top example to the right, which is blending the gray text into the brown background color, using the Multiply Blend Mode), then you'll need to perform an extra step to ensure that those effects are maintained when using transparency - which involves turning off the "Background" layer.
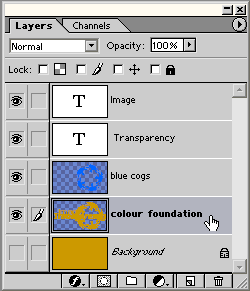 As seen here in the bottom example on the right, images will not maintain their blending effects with the document's "Background" layer turned off - it needs that layer's color to produce the blending effect. What you'll need to do is select the contents of ALL your non-background layers that are being blended with the document's background color, and fill that selection with your Web page's intended background color (see layer palette image to the left). And in case you're using a lighter color for something, like I am here for the word 'Transparency', you'll need to expand the selection by 1 pixel, before you fill it. You'd of course create a new layer for this, and then move that layer to the very bottom of the palette; just above the default "Background" layer. Having this color foundation' beneath the layers will preserve the Blend Mode effects you've created, even after you turn off the document's "Background" layer.
Note If you are blending any layers into an image or photo, then you'll need to fill that specific selection area with the image/photo, instead of a solid background color That can be done on a separate layer for ease of function, and that layer can be placed right above the other color foundation' layer.
Copyright © Mark Anthony Larmand
For help, advice, tips and tricks, challenges, feel free to visit our
| 1. Save for web |
| 2. Save for web options |
1) Create a New Layer for your document. Then use the Airbrush, or even the Type tool to add a simple image to this layer. Just do a couple of brush strokes or something, nothing fancy.
2) Now click the eye icon beside the document's "Background" layer to make it invisible. All you want showing is the simple image you created on that new layer, against the transparent checkered canvas background
.3) Open the FILE menu now and choose the "Save For Web..." option. When the export settings window opens, the first thing you check is whether the "Transparency" checkbox has a tick in it; if it doesn't, then click it to turn it on.
4) Beside the "Transparency" checkbox, there's a drop down menu named "Matte". This is where you set what color you'd like to use to surround the extreme edges of your image. This color should generally be the same as the one you'll use on your Web page. The Matte color will help smooth the edges of the image so it blends perfectly into your page's background color
5) Use the preview window to see exactly how your image will look once saved. Once you've decided what optimization settings you want to use, click OK to finish saving the image. And that's all there is to it!
That was unbelievably easy wasn't it? Much less time and steps spent to create this effect than in older versions. As a Web Designer I sure am glad Adobe added this new functionality to Photoshop. Now here's a couple of things to take note of when creating image transparency...
T I P 1 Checkout the brownish outline (also known as a halo) around this first image (on the left). That color is the same as the one that would be used as my Web page background color So using the same color for the "Matte" option makes perfect sense in this case. And now, look at the image right beside it. That is the same image, with transparency, but I selected "None" for the "Matte" option. What this means exactly is that Photoshop can remove absolutely ALL of the edge color used to blend an image into a background color But doing this is not usually preferable. Can you see how it has left the image's edges looking very harsh and unsmooth? Very jagged looking without the edge color to blend it into the background The first example will blend perfectly - see the top image below in number 2
 |
|
T I P 2 If you intend on using the Layer Blend Modes for specific types of color blending effects (as in the top example to the right, which is blending the gray text into the brown background color, using the Multiply Blend Mode), then you'll need to perform an extra step to ensure that those effects are maintained when using transparency - which involves turning off the "Background" layer.
Note If you are blending any layers into an image or photo, then you'll need to fill that specific selection area with the image/photo, instead of a solid background color That can be done on a separate layer for ease of function, and that layer can be placed right above the other color foundation' layer.
Copyright © Mark Anthony Larmand
For help, advice, tips and tricks, challenges, feel free to visit our