


Photoshop Tutorials
Background Effect
 The effect behind the image to the right is what we're going to achieve in this tutorial. This is an exercise in how to be creative with the layers palette, while using minimum filters and maximum imagination.
Creating a Funky Background
for your Text or Images.
( "Ripping Holes In The Canvas!" )
Before we begin I'd just like to say that, since this is a random effect, you probably won't get the exact pattern that I obtained in my picture. But that's ok! There's plenty of randomness out there for everyone.
I'm sure you'd much rather have something that's completely your own anyway, right? Also, you may want to create your Funky background on layers in the same .psd file as your text/graphic image.
That's fine, but make sure your computer can handle the processing. You may end up with quite a few layers in one file; unless you merge your BG FX layers together. You'd do better to create this background first, then create your text/image on layers above it; so that your background images are on the bottom of the layers palette.
I will be giving these instructions as if you were creating your background as a new picture, by itself. It can then be dragged into another image with less hassle.
| Step 1 - Step into the rainbow |
- Start by creating a new picture. Make it either the same size as the text or graphic image you intend to put it behind, or perhaps bigger if you want. Make the background white & the resolution 72 dpi.
When your canvas is ready, create a new layer. - Now select your gradient tool and apply the settings you see in the picture below.
- Now find the closest point to center and click and drag to the edge of your canvas. You can also obtain a different finished effect by starting your gradient off to the side if you'd like? You should now be seeing a multi-colored gradient: starting with red in the middle and ending with red around the edges.
- When you're satisfied with your gradient, set this layer to - OVERLAY - at 100% opacity. Name this layer COLOUR. Now click on the eye to turn this layer off for the time being, until we've done our next step.
| Step 2 - The shape of things to come |
- Create a new layer.
Leave this layer on Normal Mode and drag it below the gradient layer. Reset your foreground and background colors to black and white respectively. - Open the filters menu and go down to render. Choose clouds.
Apply it once. Repeat this, but instead of clouds choose difference clouds. Apply this at least 4 to 6 times. We need a somewhat marble-like effect, with black being the dominant color. In other words, we need more black in our clouds than white.
When you've got the effect you like, apply the Auto Levels filter to your clouds. This will create more contrast in them, and bring out the white highlights even better.
Win = Shift+Ctrl+L : Mac = Shift+Cmd+L
Before you mutilate your clouds, grab the Lasso tool and draw a very rough shape close to the edges of the canvas on your clouds layer. Make your lines squiggly & giggly & jagged!
Generally, if you make your selection a bit wider than it is high, you'll get better results. But don't make the selection too small.
- With that done, open the Select Menu and choose Feather. Set it to 10.
Now inverse your selection (inverse is in the Select menu also) and hit the delete key. Now you have a big fuzzy glob of clouds! Right?
Ok, now you can click on the eye of the COLOUR layer again to make it visible.
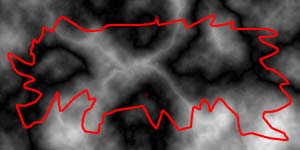 Here is an example of a shape you might make with the Lasso tool, before inverting and feathering it.
Obviously the Red Line here represents the selection Marquee you'd normally see.
| Step 3 - The right DISplace to be |
- Before we continue with the displacement of our clouds, re-invert your selection marquee so your clouds are selected. (Win - Ctrl+Shift+I) (Mac - Command+Shift+I)
Now that you've got your clouds layer feathered & deleted & selected, to the size and shape you like, let's move on to the displacement of this layer.
Next, open the filters menu and choose distort / displace.
When the Displace dialog window opens, change the settings to match the ones in this image.
Click the OK button and browse to this directory: Photoshop\Plug-ins\Filters\Dispmaps
There you will find your displacement maps. Open the Dispmaps folder.
Now here is where the fun begins!
NOTE Every map can yield an interesting and original effect, but...
we are looking for an effect that will "rip holes" in your clouds!
What I mean by this is that all of the white area in your clouds will become the holes.
The hole effect will actually happen automatically, because we also have white as our background layer color.
It's this part of the procedure that really makes the effect work.
T I P Before I begin any intrepid journey into Dr.Frankenstein Land, I always back-up my original layer first! Either by selecting all and copying it, or duplicating it by pressing Ctrl/Cmd+J. Turn the eye off on this layer. You don't need to see it. When you're done, if everything's ok, just delete this extra layer. This always makes me more intrepid about experimenting! experimenting! experimenting!
Anyhow... let's move on!
| Step 4 - Catching a wave |
- Once you've achieved the results you like, deselect your image, and stay on your clouds layer.
- Now we're going to repeat the step with the Lasso tool.
Make another squiggly & wiggly & jagged selection again. Inverse the selection and feather it at a setting of 5, then hit the Delete key.
Now Invert your selection again.
When you've done that go up to the Filters menu again and choose distort / wave.
Use the settings you see here:
- If you're in the Wave Filter, and all the appropriate settings have been made.....
Start hitting the Randomize button. And don't stop until your finger hurts! Or, you see something you like :)
When you see an effect you like, click OK to apply the filter and check out the effect on your full-size image. If you don't like the effect, simply hit the Undo and go into the filter again. Keep doing this until you get an effect you like.
When you've achieved the look you'd like to keep, you can Deselect your image.
Now... one more last thing to do.
Every time you use the Wave filter, Photoshop automatically remembers the last settings used. So the next time you go into it, your last settings will still be there. That's good to know huh? :?)
The reason it's good for us here is because now we want to take the last setting we applied to our clouds layer and apply it to our COLOUR layer as well.
This will make the colors in the Radial Spectrum follow the shape and lines of our clouds. Creating a more unified look to our image.
Once you've completed this step, that's all there is to this effect. The rest is just experimenting and having fun with it.
 This is how mine looked when I finished, and before I put my text graphic over it. It almost looks ALIVE doesn't it!
NOTES (More things to try)
- Once you've got a good clouds effect, try inverting it. It will produce a completely different effect. That's why I created a Duplicate of my clouds layer. So I can mess around and not have to worry about losing my original masterpiece.
- Try experimenting with the Type settings in the Wave filter. You might find something to your liking there.
- Try applying the wave filter more than once. I tried this too, and boy some of the results were definitely interesting!
- If you can't seem to get a desirable result, you can always start over with your clouds layer. Perhaps your marble-like texture was too strong, or not strong enough?
- Experiment by changing the Layer Blend Mode for the COLOUR layer. Some will work and some won't. But there are lots of different effects to be tried by doing this.
- If you're going to be putting this graphic on a black page, then all you have to do is invert your background layer.

Well I hope you all enjoyed this tutorial. I know it was a fun one to create!
Have a good time with it, and remember to keep on experimenting to see what else you can do with this one!
Copyright © Mark Anthony Larmand
For help, advice, tips and tricks, challenges, feel free to visit our