


Photoshop Tutorials
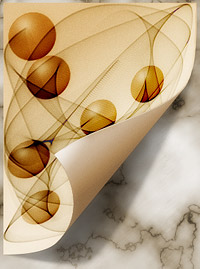
Paper Curl
PAGE 1 / 2
Note This tutorial was created using Photoshop 6. However, by converting some of the quick-keys and menu items mentioned, it can be made to work in any version of Photoshop. You should also be somewhat familiar with creating Paths before attempting this tutorial.
This is not a beginner's tutorial. But feel free to try it if you like.
Ok lets start by creating a New Document (Ctrl/Cmd+n). The dimensions will be 320w x 420h -- pixels, the Resolution should be 72, the Mode should be RGB, and our document should have a White Background.
NOTE If you like, you can go ahead now and import/insert/or create your own textured background image -- like I have here with the marble texture as my background. It's not essential to do this now though, so if you have nothing specific in mind for a background, you can just wait and do this at the end.
NOTE If you get confused at any point, try using this Quick-View Image Sequence to help make things clearer. And experienced users can use this as a quicker guide through the steps.
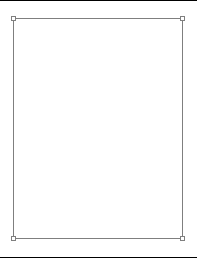
| 1. Create our basic paper shape using Paths. |
Create a new layer, and name the layer paper.
PS 6 or newer users, do the following: ( Anyone with an older version of PS, skip down to 'PS 4/5+ users'. )
Choose the rectangular Vector Shapes tool from the Toolbar.
Then select this icon from the Options Bar -- “Create New Work path”:
Now drag out a long rectangular shape -- like a normal piece of paper. Leave some space around the outer edges, so our background can still be seen a bit. Leave a bit more space than what you see in my header image at the top of the page.
Now open the Paths palette. Continue on with Step 2, below.
PS 4/5+ users, do the following:
Use the Rectangle selection tool to create a long rectangular shape -- like a normal piece of paper. Leave some space around the outer edges, so our background can still be seen a bit. Leave a bit more space than what you see in my header image at the top of the page.
Now open the Paths palette.
At the bottom of the palette, click on the "Make Work path from Selection" icon ( the circle with the handles on it ). This should change your selection into a rectangular path.
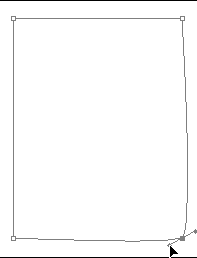
| 2. Modifying shape |
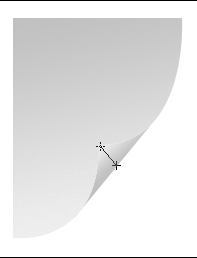
Hold down the Ctrl/Cmd key, and click anywhere on the Path. As you hold that key down, you'll see that the pen tool changes into a selection arrow tool. From now on, you'll use this method to select the control points of your Path. Let go of the key now, and the cursor changes back to the previous tool.
Now picture in your mind how you want your paper fold to look -- how far up will the curl go, and how much will the bottom curl up? Once you've decided this, move on to the next page.
If you're confused after reading this page, then watch this Quick-View Image Sequence to help make things clearer:
 1: draw paper shape path with the Vector Shape tool. |
 2: choose the PEN tool, then hold the ALT/Option key down with your mouse over the bottom right control point; as shown. |
 3: click and drag to add curve handles. |
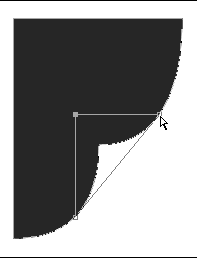
 4: move corner control point up and inward, and position curve handles; as shown. |
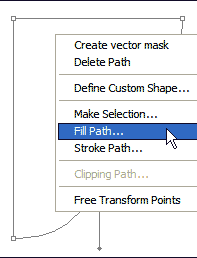 5: right-click (MAC: long-click) and choose "Fill Path" from the option menu. |
 6: the filled paper shape. |
 7: draw a small square, using the Vector Shape tool. Match the corners to the curl line; as shown! |
 8: delete the bottom right corner control point. |
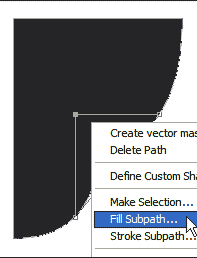 9: right-click (MAC: long-click) and choose "Fill Path/Sub path" from the option menu. |
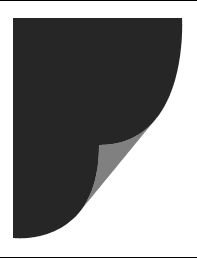 10: the filled corner curl shape. |
 11: add a Linear Gradient; as shown here -- top to bottom. |
 12: add a Linear Gradient; as shown here -- bottom to top. |
 13: create a New Layer just above the document Background, and draw a shadow shape path by using the PEN tool, and tracing the paper shape; as shown. |
 14: reshape the shadow Path for the correct effect; as shown. Then right-click (MAC: long-click) within the Path area and choose "Fill Path/Sub path" from the pop-out menu. |
 15: once it's filled, Gaussian Blur the shadow and lower the Opacity to 35%. |
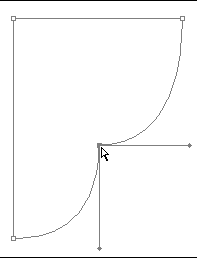
| 3. Curling our paper corner (1) |
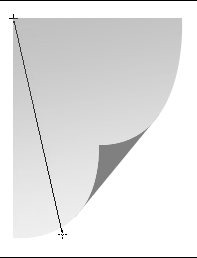
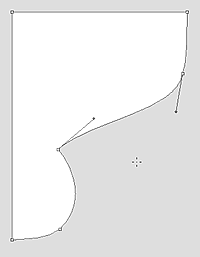 This part is pretty simple. Have a look at this example image and you'll notice I've drawn a red arrow to show you how to make the corner of the path curl inward. First however, we need to add some bezier curve handles.
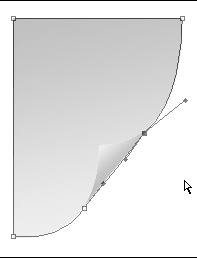
Make sure the Path is selected, then hover your mouse over the bottom-right control point. Now hold down the Alt/Option key -- you should notice your cursor changes to a half-outlined arrow head. Click and drag on the control point to drag out some curve handles.
Hold down the Ctrl/Cmd key so the selection arrow appears, then drag the corner control point up, and inward. The bottom and side edges of the path will automatically curl.
Remember, I warned you that you'd need to know how to use Paths. If you're unfamiliar or confused about this tool or these instructions, consult the Help files before continuing.
T I P If you hold the Ctrl/Cmd and the Shift keys down at the same time as you drag the control points and curve handles, it will constrict your movement to perfect 90° and 45° angles. This can be helpful at times.
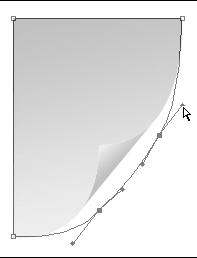
As my example shows, the paper will take on a natural bended look, just by you moving that one corner control point around. This is why I like doing this effect myself, and not with a plug-in. The plug-ins don't give you this kind of control.
And if you want even more control over the shape of the paper, you can add more control points, like I have in my example images. It's your effect, so the choice is completely up to you!
PAGE 1 / 2
Copyright © Mark Anthony Larmand