


Photoshop Tutorials
Paper Curl
PAGE 1 / 2
| 4. Curling our paper corner (2) |
T I P If I wanted my paper to look like it had a hard fold in it, then I would not move those extra control points I added, inward. I would leave them where they were originally added to the path.
Now we need to save our path, in case we need the shape later or decide to make some changes to it. Open the Paths palette if it isn't already open, and click the small arrow at the top-right. In the options menu choose 'Save Path'. Name it, and click OK.
| 5. Curling our paper corner (3) |
Press the D key to reset your Fore and Background swatches. Then within the Paths palette, click that small arrow at the top-right side again to open the options menu. Choose 'Fill Path'. Your shape should be filled with black now. Or, you can choose the Pen tool, and right-click (Mac: Ctrl-click) on the Path and choose the same command from the pop-up menu. Either way will work fine.
T I P
 - PS6+ users: To dismiss (hide) the work path, choose the "Path Selection" tool from the toolbar. You will see a large checkmark button appear on the far right side of the Options Bar; along the top of the program window. Click that checkmark button.
- PS4/5 users: Open the Paths palette option menu again, and choose 'Turn Off Path'. If you're confused after reading this page, try using this Quick-View Image Sequence to help make things clearer.
If you're confused after reading this page, try using the Quick-View Image Sequence to help make things clearer.
| 6. Adding Paper Characteristics (1) |
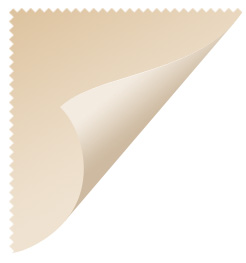
 This part is pretty simple also. Have a look at this example image and you'll see what you need to do to give the paper some color and shading.
Before applying the gradient, lock the layer's transparency. PS5+ users will click the 'Preserve Transparency' checkbox. You can choose whatever colors you like for your own paper, that's not an essential aspect here. Just make sure that your darkest color is at the top of the paper, and your 2 colors are in the same family, but different shades. I chose dark and light tan colors for mine. And try to make your colors very close in their shade. The color blend should be very subtle, not really blunt or too contrasting.
As the example shows, be sure you apply your gradient from the very top edge to the very bottom edge -- so we don't get an area of solid color
| 7. Adding Paper Characteristics (creating the missing corner) |

 Choose the Pen tool.Use the example image to the right as a guide, and create a selection just like the one shown. Basically, you're just selecting around the "imaginary" corner that's missing. Zoom right in on just that corner area to make this easier to do.
If you're not sure what I'm talking about look at this!
Once you have this Path shape created, create a new layer, move it below the 'paper' layer, then right-click (MAC: long-click) anywhere within the path area and choose the "Fill Path/Sub path" option from the pop-out menu. This will fill our shape with a solid color
And now for the magic move...
Select your paper shape, and while on the curled corner layer we just created, press Delete. This gives us the exact shape needed to fill-up the curled corner space.
 Now fill this shape using the exact same linear gradient as you used for your paper... BUT... reverse the shades, so that the darker color is on the bottom of the selection, and the lighter shade is at the top edge. Which means apply the gradient from bottom to top. (see example image) And this will produce the reverse curl effect we want.
 T I P As a tweak to this part, you'll want to open the 'Hue & Saturation' filter, and lower the Saturation level about half, then raise the Lightness setting just a bit. We're trying to create a slightly faded effect for the underside of the paper. Creating the proper kind of Path shape: ^ Back To Step 2 If you're confused after reading this page, try using this Quick-View Image Sequence to help make things clearer.
Creating the proper kind of Path shape:
 Back To Step 7
 If you're confused after reading this page, try using this Quick-View Image Sequence to help make things clearer.
| 8. Fine-tuning the look - drop shadow |
First up, a drop shadow.
To make this part as simple as can be to explain, I'm going to refer you to view steps 13, 14, & 15 of the Quick-View Image Sequence.
| 9. Fine-tuning the look - creating some edge thickness and additional highlighting |
We'll add a thin edge highlight to the curl, to help give some subtle depth to our paper. Duplicate the curled corner layer you created. Drag this duplicate layer below the original, and fill the shape with a solid white. Now click on the original curled corner layer and using the MOVE tool and arrow keys, nudge this layer 2 pixels down. Notice the thin edge highlight that appears along the top of the curled edge? It's very subtle, but it helps give the paper some visible thickness.
 Additional highlighting: Pick the Airbrush now and then select the curled corner shape. Now with that selection active, on a new layer right above the curled corner layer, paint with white over top of just the curled tip of the paper's corner. Like it shows in this example image. Notice the highlight is only applied to the very tip of the curl; which makes it appear to really curl inward. Drop the Opacity to around 70%, and set the Blend Mode to Overlay. If the highlight looks too harsh, leave the selection on and Gaussian blur the paint a bit until it softens up. Then Deselect when you're done this.
| 10. Fine-tuning the look - curling what's on the paper |
 I'm sure a lot of you are hoping that I'll cover this, because some of you may not be very sure of how this is achieved. Well there's a simple method, and a not-so-simple method.
 SIMPLE: Once you create the picture or type that will appear on the paper, you just have to use the EDIT > Transform > Distort tool to drag the bottom-right corner of your image/type until it looks like it's conforming to the bend in the paper. Honest! That's all there is to it!
NOT-SO-SIMPLE: By duplicating the 'paper' layer, and filling the shape with a vertical Linear gradient, you can use the 'Displace' filter to force the image to be put on the paper, to curl. This method is best left to those experienced users, as it can be somewhat complex and confusing if you're not at all familiar with using the 'Displace' filter. If you're curious about this method, I suggest you visit the Tech Slop site, it has some excellent tutorials on the subject.
In most cases, the 'Simple' method can suffice. The only thing I'd suggest to help this part look better, is to add a Brightness & Contrast adjustment layer right above your image, and apply a linear gradient diagonally to it that is lighter on the top and darker on the bottom. Then clip/group this adjustment layer to the layer containing the picture or type that will be on the paper. This will help make the picture/type look like it's bending/curling more. You should only need to turn down the Brightness to -10 or so. ( See example image to the right. )
Ok well... there it is then. Hope that wasn't too painful!
If you're struggling with any part of this tutorial, I suggest you go through it once more to be sure you read everything thoroughly. If you're still having trouble, feel free to ask questions about this effect in the Forum. But remember, a lot of the techniques for this effect are at least intermediate level stuff. Those of you not at this level yet can very well expect to have some trouble. Just go and learn about the things that are confusing you, and return to finish the tutorial another day. It'll still be here when you return... honest.
Copyright © Mark Anthony Larmand
For help, advice, tips and tricks, challenges, feel free to visit our
PAGE 1 / 2