Photoshop Tutorials
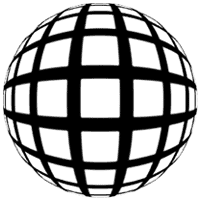
Creating a Mercator (wire frame sphere)

Gerhardus Mercator: Flemish cartographer, who developed the "Mercator projection" (1568).
3D artists know this as "Spherical Projection, or Mapping".
A map in which the meridians and the parallels of latitude are shown as straight lines that cross at right angles, and in which areas appear more distorted the farther they are from the equator.
This image can have a number of different looks to it, the most popular being the one where the lines all appear like strings that have been wrapped around the shape of a sphere ('Style 2' in this tutorial). This kind of image is most often created with an Illustration program too. But with a little resourcefulness, it can also be created using a non-illustrative program, such as Photoshop. We'll be covering 2 styles here -- the one you see to the upper right (style 1), and the one following this, which is the 'Style 2' mentioned above. And as a bonus page, I'll show a couple of quick ways to alter & add to this image to help make it look a lot different.
Note to mac users: The PC key Ctrl = the Mac key Cmd. And the PC key Alt = the Mac key Option.
Don't forget to SAVE after every 2 or 3 steps!
| Step 1 |
| Step 2 |
| Step 3 |
| Step 4 |
In case anyone is curious... the reason we didn't use the Magic Wand tool to select the white is because the 'Select Color Range' function gives cleaner results; and is easier to explain. Also... older versions of Photoshop do not have the new 'Background Eraser & Magic Eraser tools -- but they DO have the 'Select Color Range' function. So doing this step this way means everyone can do it using the same method.
| Step 5 |
Under the FILTER menu, choose "Other", then "Maximum...". Set it to 3px. This, as you'll notice, will remove 3 pixels from the thickness of your lines. In case you're wondering... this step cannot be done automatically for us using the "Halftone Pattern" filter; it doesn't work like that. That's why we do it this way.
| Step 6 |
| Step 7 |
| Step 8 |
| Step 9 |
 This step is hard to explain, so please read carefully...
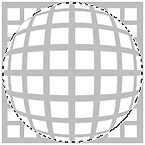
 Now use the Elliptical selection tool. Hold the ALT & Shift keys down; click as close to the exact middle of the sphere as you can, and scale a selection that is almost exactly the same size as the globe shape. You can get it close, then nudge it into perfect position afterward using the arrow keys. You want the selection centered within the globe shape.
NOTE: I've lightened my image here so you can see my selection more easily.
Copyright © Mark Anthony Larmand


