


Photoshop Tutorials
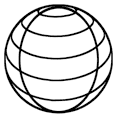
Creating a Mercator (wire frame sphere)
Now we're going to add the vertical lines to the sphere so it looks more like a wire frame globe.
I know this may seem a bit long to you right now, but trust me, once you know the steps this effect can take literally minutes to create -- especially if you create an Action to do most of the work. Speaking of which... this is the part that would be difficult to create using an Action. It involves some manual selection making, that's why.
NOTE TO MAC USERS: The PC key Ctrl = the Mac key Cmd. And the PC key Alt = the Mac key Option.
Don't forget to SAVE after every 2 or 3 steps!
Create a New Layer above your 'base sphere' layer. You don't have to name this one, unless you want to.
Ctrl-Click the original shaded sphere layer to create a selection of it. Now Stroke this selection by 5 pixels, in the center (EDIT>Stroke...)
 Under the EDIT menu, go to the 'Transform' option and choose the 'Scale' function. Hold down the ALT key and grab one of the side side control handles, and drag it inward so the circle gets thinner. Make it look like an oval -- like in this example image here.
 Create another New Layer, and repeat the same steps as above, but this time, resize the circle even thinner than the first one -- like the example image here. You'll notice that after doing this, the line gets really thin. We fix this easily by using the 'Minimum' filter found under the 'Other' option (FILTER>Other>Minimum...).
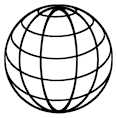
And after both of the vertical line layers have been created to your satisfaction, then click on the top one and press Ctrl+E to merge them together. Then, merge the vertical lines layer to the 'base sphere' layer. And now you should have only one layer that has your entire mercator on it. Now you're free to color it, or fill it with a texture, or whatever.
And that's all there is to it.
We're Done!
That wasn't so bad was it?
T I P S
First off... I would have to say that I got a 'cleaner' line result with PS7 than I did with PS6. And I believe the main reason to be the new sub filter 'Anisotropic', found under the 'Diffuse' filter. Unlike blurring, it can smooth out lines without having to soften them. And that apparently made a big difference in the corners of the line intersections.
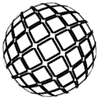
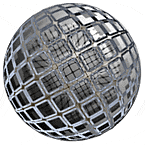
 Now we're going to create some different types of looks and effects to our original wire frame sphere. There are of course unlimited options here for this, but I'm going to get you started off exploring by showing you a few I've found. This header image to the right is just one good example of how far you can develop a simple mercator, toward creating a more complex graphic.
Feel free to wander away from this tutorial at any time, if you get inspired to follow a different path. Like I said... these ideas are just to get you kick-started on your way.
However... please don't be fooled into thinking the effect shown here is a simple one. It WILL take you a little while to get through this material.
Even though 'Style 2' is the more used style, I want us to use 'Style 1' here, so I can show you how to create the inner wire frame sphere of the header graphic beside the title above.
So you can save and close your 'Style 2' document, and re-open your 'Style 1' document. If you haven't DONE the 'Style 1' tutorial, then you'll have to do it now before you continue on here.
Don't forget to SAVE after every 2 or 3 steps!
Ok so your 'Style 1' document should have only 2 layers -- the mercator layer and the document Background layer. If it doesn't, then do whatever you have to to make it this way.
 Then... if you didn't rotate your mercator at the end of the tutorial, do that now. Press Ctrl+T, and in the settings box for the Rotate function put -30. In PS6 & 7, look for this symbol along the Option Bar for the Transform tools.
Press Ctrl+J to duplicate the 'mercator' layer. Name this layer '1'. Then press Ctrl+I to invert the color to white. WOW! Hey what do you know... we have a pencil outline of the mercator. That could be useful!?
 Now this next part will depend on how closely you followed my instructions from the tutorial. But I'm showing you an example image here so you can see exactly what I'll be explaining.
Under the FILTER menu, choose 'Other>Maximum'. Set it to 3. Then look at my example image here. If your white lines don't look like mine, then either increase or decrease the amount until they do look the same. You want very thin lines, with small dots at the line intersections. Once you have the right setting, click OK to apply it. Then change the Blend Mode to Exclusion.
And to help make these lines and dots stand out better against this busy image (you'll see the effect of this later on), press Ctrl+J to duplicate this layer. Name this new layer '2'. Now move this layer right below layer '1'. Press Ctrl+I to invert the white to black, and set this layer's Blend Mode to Overlay.
Ok now duplicate the 'mercator' layer again, and make sure this layer is in below layer '2'. Name this layer '3'. Press Ctrl+I to invert the black lines to white. And then change the Blend Mode to Exclusion.
 Create another new layer and move it so it's right above the bottom 'mercator' layer. Name this new layer '4'. Then create a circular selection the exact same size as the mercator is. The easiest way is to hold the ALT & SHIFT keys down, click in the center of the mercator, and drag outward until you reach the desired size.
Now fill the selection with a white-to-black Radial gradient, starting at the top-right, and ending at the bottom-left. Your image should look similar to the one shown here. Now change the Blend Mode of the gradient sphere layer to 'Overlay'.
Leave the selection going.
Don't worry... we'll get this look back again in a few more steps.
Duplicate layer '3'. Name this duplicate layer '5'. Now change your color swatches to be white and a medium sky blue -- not too dark, not too light. Ctrl-click on the layer to select the mercator shape, and run the Clouds filter on the selection. Then Deselect, and change the Blend Mode to Multiply. Also, turn down the Opacity of this layer to 25%.
This next part is a bit complex, so there's no 'quick' way to explain it. But if you don't let your mind wander, it shouldn't take too long to get through.
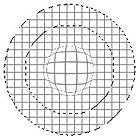
Create a new layer above the original 'mercator' layer. Name this new layer '6'. Hide the other layers above this one by clicking on their eye icons; we need to see the contents of just this layer while we work on it. Now Ctrl-click on the gradient sphere layer to create a circular selection. Then Fill the circular selection with white. Keep the selection going. Under the FILTER menu, choose "Sketch", then "Halftone Pattern...". Set the 'Pattern Type' to LINE. Then set the Contrast to full, and the line thickness to 2px. Press OK to apply. Now under the FILTER menu choose 'Other>Maximum'. Set it to 2 pixels. Press OK.
Press Ctrl+J to duplicate this layer. Then under the EDIT menu, choose 'Transform>Rotate 90 CW'. Now change this layer's Blend Mode to Multiply, and press Ctrl+E to merge these 2 striped layers together.
Merging layers deactivates a selection, so Ctrl-click the grid layer to select it again. Then Contract the selection by 50 pixels. Users with older versions of PS should just create a new selection over the middle of the mercator that's 50x50 pixels. Now Feather the selection by 2 pixels. Run the Spherize filter on the selected area, using the settings +100% and 'Normal' mode.
 Now Expand the selection by 25 pixels -- Users with older versions of PS will have to do this in 2 stages. Now invert the selection by pressing Ctrl+Shift+I. And now we need to intersect our selection with the main circle shape. Do this by holding down the Alt, Shift, and Ctrl keys all at the same time, then clicking on the layer. You should now have a donut shaped selection going; like the one shown here. If you don't get this result, press Ctrl+Z to Undo and try it again. Hold all the keys firmly down while you click.
Now under the FILTER menu, choose 'Distort>Pinch'. Set it to +100% and apply it. Now Ctrl-click layer '4', so we have this grid circle fully selected, and run the Spherize filter on the selected area. Set the filter this time though to -100% and 'Normal' mode. Now Feather this selection by 10 pixels, invert the selection, and press the Delete key 3 times. Then Deselect.
And finally... change this layer's Blend Mode to Multiply.
There, that wasn't so bad was it?
 Ok we're almost done the effect. Just a couple more things to do.
Click on the original 'mercator' layer, then create a new layer above it. Name this new layer '7'. Press the D key to reset your Fore & Background colors. Then run the Clouds filter. Ctrl-click layer '4', to get a circular selection. Now under the FILTER menu, choose 'Pixelate>Mosaic'. Set it to 15, and apply it. And now run the Unsharp Mask with the settings 150% / .5 / 0. Then run the Spherize filter 2 times, with the settings +100% and 'Normal' mode. Now press Ctrl+Shift+I to invert the selection, and press the Delete key. And now Deselect.
Under the EDIT menu, choose 'Transform>Rotate'. Rotate the sphere -30 degrees -- this matches the lines up with the rest of the other lines.
And last but not least, change the layer's Blend Mode to Exclusion. You should now have an image similar to the one shown here. What can effect the look a fair bit is when you ran the Clouds filter. Since it's a random filter effect, everyone's results will look different.
Well I hope you found this interesting, to say the least. And that you came away with something from it, even if things didn't turn out perfect for you -- the first time anyway ;). There are a lot of things that can be learned from the steps for this effect; only one of which is the final result shown here.
T I P S
Have fun!
Copyright © Mark Anthony Larmand
For help, advice, tips and tricks, challenges, feel free to visit our
I know this may seem a bit long to you right now, but trust me, once you know the steps this effect can take literally minutes to create -- especially if you create an Action to do most of the work. Speaking of which... this is the part that would be difficult to create using an Action. It involves some manual selection making, that's why.
NOTE TO MAC USERS: The PC key Ctrl = the Mac key Cmd. And the PC key Alt = the Mac key Option.
Don't forget to SAVE after every 2 or 3 steps!
| Step 1 |
| Step 2 |
| Step 3 |
Under the EDIT menu, go to the 'Transform' option and choose the 'Scale' function. Hold down the ALT key and grab one of the side side control handles, and drag it inward so the circle gets thinner. Make it look like an oval -- like in this example image here.Create another New Layer, and repeat the same steps as above, but this time, resize the circle even thinner than the first one -- like the example image here. You'll notice that after doing this, the line gets really thin. We fix this easily by using the 'Minimum' filter found under the 'Other' option (FILTER>Other>Minimum...).And after both of the vertical line layers have been created to your satisfaction, then click on the top one and press Ctrl+E to merge them together. Then, merge the vertical lines layer to the 'base sphere' layer. And now you should have only one layer that has your entire mercator on it. Now you're free to color it, or fill it with a texture, or whatever.
And that's all there is to it.
We're Done!
That wasn't so bad was it?
T I P S
First off... I would have to say that I got a 'cleaner' line result with PS7 than I did with PS6. And I believe the main reason to be the new sub filter 'Anisotropic', found under the 'Diffuse' filter. Unlike blurring, it can smooth out lines without having to soften them. And that apparently made a big difference in the corners of the line intersections.
- This entire effect can be made into an Action. But as an Action it would be best if you followed the advice given in tip 4, below. I would also advise that if made into an Action, you get the Action to create a new document for the mercator effect, and not combine it with any current image you may be working in. Once the effect is made, you can just merge the layers and drag it into the current document you're working in.
- If your circle's border is uneven, just Ctrl-click the 'grad sphere' layer and invert the selection. Then while on the outline layer -- 'base sphere' -- press Delete. Now invert the selection back again and under the EDIT menu choose Stroke. Apply a 7 pixel stroke, in the center. That should give you a nice clean border.
- If you want the lines to be thicker, then apply the 'Minimum' filter to the layer (FILTER>Other>Minimum). I would not go higher than 1 or 2 pixels using this filter though. The lines will start to look distorted.
- There's a way to get even slightly nicer results for this effect. Start out making your globe at twice the size you intend on using. Then, after all the steps have been done, resize your document down by 50%. Because Photoshop reinterpolates the image, the lines become a little smoother. This is especially good if you plan on thickening the lines up, as mentioned in the previous tip.
And the point here is that just because you don't find a solution to a problem right away, doesn't mean there isn't one to find. You just really have to persist with your experimenting until you discover the right filter, using the perfect settings, to produce the effect you're after. - It took me several hours of playing around to discover that the 'Anisotropic' setting of the 'Diffuse' filter (in PS7) was the filter that would allow us to really clean up and smooth out the edges of the lines. I tried many other filters before coming across this one.
- At this point, you might do well to create a new custom Brush out of your mercator shape. That way, when you need another one, it will only be one click away. If you like the way it looks that is.
In PS7: Just make sure the mercator layer is active, then under the EDIT menu choose "Define Brush".
In PS6 & 5.5: Ctrl-Click the mercator layer to select it, then open the EDIT menu and choose "Define Brush".
If you're wondering why I don't suggest creating a Vector Shape from this, it's because Photoshop's results pretty much suck when it tries to convert this image to vector. The lines are just not smooth enough for it, to make it easier for PS to do. You'd be better off creating one in a vector (Illustration) program and importing it. At least though as a brush, you have the option of scaling it before you create it -- in PS7 only though. Earlier versions will have to create it, then use the 'Transform>Scale' tool.
Now we're going to create some different types of looks and effects to our original wire frame sphere. There are of course unlimited options here for this, but I'm going to get you started off exploring by showing you a few I've found. This header image to the right is just one good example of how far you can develop a simple mercator, toward creating a more complex graphic.Feel free to wander away from this tutorial at any time, if you get inspired to follow a different path. Like I said... these ideas are just to get you kick-started on your way.
However... please don't be fooled into thinking the effect shown here is a simple one. It WILL take you a little while to get through this material.
Even though 'Style 2' is the more used style, I want us to use 'Style 1' here, so I can show you how to create the inner wire frame sphere of the header graphic beside the title above.
So you can save and close your 'Style 2' document, and re-open your 'Style 1' document. If you haven't DONE the 'Style 1' tutorial, then you'll have to do it now before you continue on here.
Don't forget to SAVE after every 2 or 3 steps!
| Step 1 |
| Step 2 |
Now this next part will depend on how closely you followed my instructions from the tutorial. But I'm showing you an example image here so you can see exactly what I'll be explaining.Under the FILTER menu, choose 'Other>Maximum'. Set it to 3. Then look at my example image here. If your white lines don't look like mine, then either increase or decrease the amount until they do look the same. You want very thin lines, with small dots at the line intersections. Once you have the right setting, click OK to apply it. Then change the Blend Mode to Exclusion.
And to help make these lines and dots stand out better against this busy image (you'll see the effect of this later on), press Ctrl+J to duplicate this layer. Name this new layer '2'. Now move this layer right below layer '1'. Press Ctrl+I to invert the white to black, and set this layer's Blend Mode to Overlay.
| Step 3 |
| Step 4 |
Create another new layer and move it so it's right above the bottom 'mercator' layer. Name this new layer '4'. Then create a circular selection the exact same size as the mercator is. The easiest way is to hold the ALT & SHIFT keys down, click in the center of the mercator, and drag outward until you reach the desired size.Now fill the selection with a white-to-black Radial gradient, starting at the top-right, and ending at the bottom-left. Your image should look similar to the one shown here. Now change the Blend Mode of the gradient sphere layer to 'Overlay'.
Leave the selection going.
Don't worry... we'll get this look back again in a few more steps.
| Step 5 |
| Step 6 |
Create a new layer above the original 'mercator' layer. Name this new layer '6'. Hide the other layers above this one by clicking on their eye icons; we need to see the contents of just this layer while we work on it. Now Ctrl-click on the gradient sphere layer to create a circular selection. Then Fill the circular selection with white. Keep the selection going. Under the FILTER menu, choose "Sketch", then "Halftone Pattern...". Set the 'Pattern Type' to LINE. Then set the Contrast to full, and the line thickness to 2px. Press OK to apply. Now under the FILTER menu choose 'Other>Maximum'. Set it to 2 pixels. Press OK.
Press Ctrl+J to duplicate this layer. Then under the EDIT menu, choose 'Transform>Rotate 90 CW'. Now change this layer's Blend Mode to Multiply, and press Ctrl+E to merge these 2 striped layers together.
Merging layers deactivates a selection, so Ctrl-click the grid layer to select it again. Then Contract the selection by 50 pixels. Users with older versions of PS should just create a new selection over the middle of the mercator that's 50x50 pixels. Now Feather the selection by 2 pixels. Run the Spherize filter on the selected area, using the settings +100% and 'Normal' mode.
Now Expand the selection by 25 pixels -- Users with older versions of PS will have to do this in 2 stages. Now invert the selection by pressing Ctrl+Shift+I. And now we need to intersect our selection with the main circle shape. Do this by holding down the Alt, Shift, and Ctrl keys all at the same time, then clicking on the layer. You should now have a donut shaped selection going; like the one shown here. If you don't get this result, press Ctrl+Z to Undo and try it again. Hold all the keys firmly down while you click.Now under the FILTER menu, choose 'Distort>Pinch'. Set it to +100% and apply it. Now Ctrl-click layer '4', so we have this grid circle fully selected, and run the Spherize filter on the selected area. Set the filter this time though to -100% and 'Normal' mode. Now Feather this selection by 10 pixels, invert the selection, and press the Delete key 3 times. Then Deselect.
And finally... change this layer's Blend Mode to Multiply.
There, that wasn't so bad was it?
| Step 7 |
Ok we're almost done the effect. Just a couple more things to do.Click on the original 'mercator' layer, then create a new layer above it. Name this new layer '7'. Press the D key to reset your Fore & Background colors. Then run the Clouds filter. Ctrl-click layer '4', to get a circular selection. Now under the FILTER menu, choose 'Pixelate>Mosaic'. Set it to 15, and apply it. And now run the Unsharp Mask with the settings 150% / .5 / 0. Then run the Spherize filter 2 times, with the settings +100% and 'Normal' mode. Now press Ctrl+Shift+I to invert the selection, and press the Delete key. And now Deselect.
Under the EDIT menu, choose 'Transform>Rotate'. Rotate the sphere -30 degrees -- this matches the lines up with the rest of the other lines.
And last but not least, change the layer's Blend Mode to Exclusion. You should now have an image similar to the one shown here. What can effect the look a fair bit is when you ran the Clouds filter. Since it's a random filter effect, everyone's results will look different.
Well I hope you found this interesting, to say the least. And that you came away with something from it, even if things didn't turn out perfect for you -- the first time anyway ;). There are a lot of things that can be learned from the steps for this effect; only one of which is the final result shown here.
T I P S
- One place you can effect the final look is to alter the colors used to color the mercator -- should be the 3rd layer from the top. Also... try setting that layer on Exclusion blend mode for a different look.
- Another way to alter the look of this effect is to turn off layer '4'. This produces an interesting outlined effect. Play around with turning off and on some of the other layers. See what you can find in variations for the look.
Have fun!
Copyright © Mark Anthony Larmand
For help, advice, tips and tricks, challenges, feel free to visit our