


Photoshop Tutorials
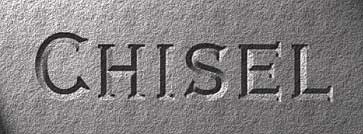
Chiseled And Carved Text
PAGE 1 / 2
| Step 8 |
Turn off the eye for the 'alpha texture' layer, and activate the 'chiseled text' layer; our cement texture. Then open the Lighting Effects filter.
Immediately change the 'Texture Channel' option to your 'alpha chisel' channel. Now, for a general chiseling effect we're going to use the Default light style - one SpotLight - but alter the settings to match the ones below
 :
:Intensity = 35
Focus = 100
Gloss = -50
Material = 100
Exposure = 0
Ambience = 21
Texture Channel = 'alpha chisel'
White is high = ON
Height = 100
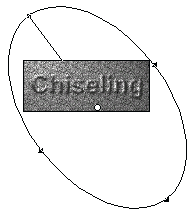
The placement of the spotlight should be as close as possible to the one in this example image.
When you're ready, click OK to apply.
| Step 9 |
Ctrl-click the 'alpha texture' layer to select the text. Then invert the selection; Ctrl+Shift+I. Make sure you have the 'chiseled text' layer active, and press Delete. Then invert the selection back again.
| Step 10 |
Name it Edge clarity. Then, using black as your Foreground color, Stroke the selection 1 pixel / in the center. Then Deselect. Now apply the Blur filter to the layer (not Gaussian blur, just Blur). Open the Emboss filter and use these settings:
Light Source = 135
Height = 2
Amount = 150
Now set this layer's Blend Mode to Overlay, and the Opacity to 70 percent. This is a very subtle effect, but helps to make the edges of the text even cleaner than the Lighting filter did. If you want to really see what this layer is doing, set its Blend Mode to Color Dodge. The effect you'll see is a more exaggerated one, but the same effect. Don't forget to change the layer back to Overlay again.
Now we're going to create the shadows : one for the base and one for depth.
| Step 11 |
| Step 12 |
Drag the duplicate below the 'base shadow' layer, and name it 'long shadow'. This will be a special type of shadow that adds more realism to the effect; I use this type of shadow a lot. It will give the chiseled text the illusion of height, without making it look like it's floating 'above' the surface. Instead, it will make the text appear to be chiseled 'out' of the surface.
Press Ctrl+A to select All, then press Ctrl+H to hide the selection. Now pick the Move tool. Hold down the Alt (Mac: Option) key and keep it pressed. While you're holding it down, use the arrows keys and do this sequence of moves:
down 1 / right 1 : repeat 3 times. So in total that's 4 pixels down and 4 pixels right.
Now, Deselect the shadow text (Ctrl+D) and apply the Blur More filter to this layer, and turn this layer's Opacity to around 30-40 percent; it will depend on how dark your background surface texture is. If you'd like a harsher light source effect, try 60-70 percent.
And that's it! How's it look?!
T I P S
Here are a few extra things you can do to either embellish or alter this effect.
a) To produce a bit more 'edge' on the look of the chiseled text, apply the Unsharp Mask filter to its layer using these settings: Amount=50 / Radius=.5 / Threshold=0.
b) To compliment the effect, apply the Lighting Effects filter to your surface texture layer, using the exact same settings, but change the 'Texture Channel' to 'none'.
c) To modify the strength as well as the look of the effect on the text, try these things:
- Turn on the 'alpha texture' layer (top of the layers palette), and set its Blend Mode to Color Dodge. Turn its Opacity down to 40-50 percent.
OR - Turn on the 'alpha texture' layer, and set its Blend Mode to Soft Light, at 100 percent Opacity.
OR - Turn on the 'alpha texture' layer, and set its Blend Mode to Hard Light, and its Opacity down to 50 percent.
OR - Turn on the 'alpha texture' layer, and set its Blend Mode to Difference, and its Opacity anywhere from 50-70 percent. Try this also with the Blend Mode set to Exclusion.
OR - Turn on the 'alpha texture' layer, and set its Blend Mode to Lighten, and its Opacity anywhere from 30-60 percent.
OR - Create a new layer above the rest, and select the text from the 'alpha texture' layer. Then fill the selection with a color or gradient effect. And set its Blend Mode to Soft light or Overlay. Then adjust the layer's Opacity to suit your liking.
How's that for experimenting?
And now, if you'd like to create a 'carved-in' effect instead, simply do this:
First of all, you don't need to open a new document for this. Just create a new layer (drag it to just below the 'alpha texture' layer) and fill it with the same 'cement' texture pattern that you used in the previous effect.
Now do the above steps 1 through 8, exactly the same.
BUT... in the Lighting Effects filter settings, untick the 'White is High' option. That will produce an inverted effect to the one we just did. And to make it even easier, you don't need to do the 'shadow' layers or the 'edge clarity' layer at all. And that's all there is to it.
T I P But try all of those above Tips on the 'carved in' text effect as well. Ya never know!
Oh, and one more thing...
Once you're comfortable doing the steps for creating that special alpha channel effect (the special pipe grad text effect), make an Action out of them!
I hope everyone has found this info enlightening.
And don't forget! You saw this 'special pipe gradient' technique here first!
Till next time!
Copyright © Mark Anthony Larmand
For help, advice, tips and tricks, challenges, feel free to visit our
PAGE 1 / 2