


Photoshop Tutorials
Classy Glass Buttons
PAGE 1 / 2
Note: With the exception of a couple of Blend Modes used, this tutorial should be possible with any version of Photoshop. If it's not, please let me know -- so I can eat crow.
Later on, we'll go through some ways of using the button differently, as well as ways of expanding the look of the effect.
Note to Mac users:
The PC key Ctrl = the Mac key Cmd.
And the PC key Alt = the Mac key Option
| Step 1 |
256x256 px
RGB
White as BG
Pick the Gradient tool, and choose the Radial style from the Options bar. For this specific example, choose the same colors I used: Foreground=(R255 G211 B38) and Background=(R57 G0 B0). (We'll use these for our button as well.) On the Background layer, start the tool as close to center as you can, and drag the tool outward toward the corner of the canvas. Release the mouse when you get to the edge. Open the FILTER menu and choose 'Noise'. Amount 3, Gaussian, Monochromatic. Then apply the Paint Daubs filter ( FILTER>Artistic>Paint Daubs ) with the settings of 10/20/Simple. Then apply the Unsharp Mask at 100%/0.5/0.
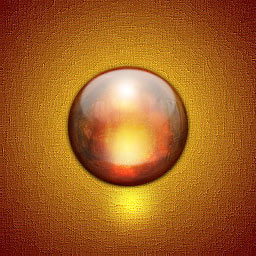
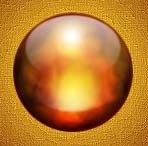
Your results should appear very similar to the background in the header image above.
| Step 2 |
Try to get the size close to 120 pixels. Fill the selection with a Radial gradient using the same colors as we just used for the Background. Start the grad tool in the lower center position of the circle; bottom half. And drag and release the tool just below the top of the circle selection. This strengthens the 'hot-spot' effect near the bottom center area of the button.
Now select ALL, and cut and paste the sphere back into it's layer. This centers it perfectly.
| Step 3 |
 Duplicate 'Layer 1'.
Flip the layer vertically, and set it to Hard Light. Name it 'hardlight'.
Duplicate 'Layer 1'.
Move this to the top of the palette. Set it to Lighten and lower the Opacity to 50%. Name it 'lighten'.
Duplicate the 'lighten' layer.
Set the layer on Color Burn blend mode. Name it 'burn'.
T I P: Apply this to 'Layer 1'. You can smooth/blend the edges of the overall sphere a little better, if you activate and Ctrl-click 'Layer 1'; invert the selection; feather the selection by 1 pixel; and hit the Delete key 2x. Then Deselect.
| Step 4 |
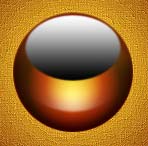
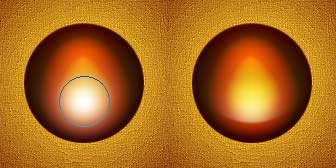 New Layer, make sure it's at the top of the Layer Palette. Make your Foreground color white. Grab a 65 pixel soft-edged brush. Use white, and give a quick click of the brush on the bottom center of the sphere -- right between the bottom and the center of the sphere. ( image on the left ) We're creating a fuller looking hot-spot. Lower the Opacity to 65%. ( this is actually the spot where the light source is refracting inside the glass )
Ctrl-click 'Layer 1' to create a selection of it; but stay on your current layer. Pick any selection tool, then hold down the Shift key and tap the up arrow key 3x. Press Ctrl+J. Pick the MOVE tool, then hold Shift again and hit the down arrow key 1x. Apply the FILTER>Blur>Blur More filter. Lower the Opacity to 55%. ( image on the right )
| Step 5 |
 New Layer. Ctrl-click 'Layer 1' to make a selection of the sphere, then Feather the selection 1 pixel. Grab that same brush as used above, with white again, and make a quick pass along the top half of the sphere/selection. Just be sure to brush over the top edge of the sphere. Set this layer on Soft Light mode. Deselect.
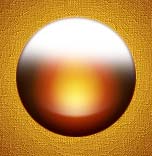
( example here shows layer before Soft light blend mode is applied. )
| Step 6 |
Your Foreground color should be white. Click once in the middle of the sphere, just above center. This represents the reflection of the main light source from above. Leave this layer on Normal mode, and at 100% Opacity.
( the top white spot seen in the header image. )
| Step 7 |
 New Layer; should be on the top of the palette.
Ctrl-click 'Layer 1' again to select the sphere. Fill the selection with a white-to-black Linear gradient, going from top the bottom. Now Deselect, and scale the circle to 50% it's height using the Transform>Scale tool. After you've adjusted the height, hold down the Alt key and drag one of the side handles inward just a little bit. Just so the side edges of the gradient circle match the side edges of the gradient sphere underneath it. Then apply the Blur filter ( FILTER>Blur>Blur ). Change the blend mode to Screen, and lower the Opacity to 65%. ( example here shows layer before Screen blend mode is applied. )
| Step 8 |
 Click on the 'burn' layer to activate it.
Then create a new layer right above it. Press the D key to reset your Fore and Background swatches. Now hold down the Alt key and apply the Clouds filter. Press Ctrl+Shift+L to apply 'auto levels'. Open the 'Glass' filter ( Filter>Distort>Glass ) and apply it with these settings: Distortion=9; Smoothness=3; Texture=Tiny Lens; Scaling=200%. Ctrl-click 'Layer 1' to create a circular selection, and apply the Spherize filter 2x in a row. Then invert the selection and press Delete. Deselect, and set this layer to Overlay. If the effect looks too strong, just lower the Opacity a little. Name this layer 'texture'.
NOTE: If you want to experiment, try inverting the colors of the previous layer by pressing Ctrl+I. You may like the look of the effect better this way. If not, change it back.
PAGE 1 / 2
Copyright © Mark Anthony Larmand