


Photoshop Tutorials
Text Filled with Colors, Gradients or Textures

| Step 1 |
Attributes: 300x150 pixels / RGB / White Background.
| Step 2 |
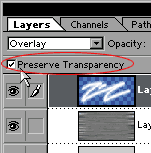
Photoshop 5+ users: for the purpose of this exercise, Render your type layer first before continuing. Then click in the 'Preserve Transparency' checkbox to turn it on.
Photoshop 4 users: check to make sure the 'Preserve Transparency' checkbox is ticked ON after you've entered your type to a layer, and Deselect the text if it has become selected.
| Step 3 |
Press the keys Alt+Delete (Mac: Option+Delete)
Filling with the Background color
Press the keys Ctrl+Delete (Mac: Command+Delete)
T I P S
- When you only have one object on a layer, using the 'Preserve Transparency' option in the layers palette will more often produce better fill results than loading the layer's transparency channel. Plus, it's a whole lot quicker to do. Filling a selection can sometimes produce faint halos around certain types of selections, especially if you're moving the object around on the layer while it's selected. This applies to any selectable object, not just text.
- If you have more than one object or word on a layer, and you want
 to apply a fill (or other effect) to only certain parts of the layer's content, turn on the 'Preserve Transparency' option, and just draw or create a selection that surrounds only the pixels or word you wish to effect.
This does 2 things for us:
One - The selection applies the desired effect only to specific pixels on the canvas.
Two - Preserve Transparency still protects the transparent areas of the layer where we don't want the effect to be applied. I use this method all the time for lots of things.
For PS5+ users: your type must be rendered first to do this on the type layer. If you don't wish to Render your type just yet, then select the area to be effected, and press the Ctrl+J keys (Mac: Command+J). The short-cut for 'New Layer via Copy'. Then apply your effect to the new 'copy' layer; with 'Preserve Transparency' turned on.
 For everyone, (but especially Photoshop 5 & 5.5 users), if you wish to not Render or destroy your original text layer, but still want to apply more than a simple one color fill to it (such as a gradient fill), then you can also use 'Clipping Groups' to achieve this. Create a New Layer just above your type layer, and 'Clip' the new layer to the type layer (go here to learn about Clipping Groups). Then go ahead and fill the empty layer with whatever gradient or other color effect you wish to create.
Have fun!
Copyright © Mark Anthony Larmand
For help, advice, tips and tricks, challenges, feel free to visit our