


Photoshop Tutorials
Motion Trails
PAGE 1 / 2
 For anyone that doesn't know this, creating a straight motion trail for an object can be done easily, using a standard, multiple 'Wind' filter application on the image. The filter would be applied to a copy of the main object layer, and filled with white, with the Opacity turned down a little.
Creating a flying or bouncing motion trail for an object can be a bit more involved; but still rather easy to do. That's what we're going to cover here. There are a few other ways of creating this effect, but this is the method I've chosen to use for this particular tutorial - using the Shear filter.
To make things easier for you to follow, I've created a tutorial file for you to use for this - containing a bg sky and a golf ball. So if you're working in Photoshop while you're reading this, download this small PSD file (212KB). If you're just reading at this time, then download the file now anyway so you'll have it for later.
After you've done that, then do the following:
| Step 1- Motion Trail #1: a flying motion trail |
Now we'll begin...
Create a new layer, above the golf ball layer.
Create a rectangular selection that is the same width as the golf ball, but only make it about 10 pixels in height. This number can increase slightly if your image/flying object is much larger than the size used for this tutorial. But generally, 10 pixels will work just fine.
| Step 2 |
| Step 3 |
| Step 4 |
After this filter, we need to remove the black. Before doing that though we need to sharpen the edges of the white and black colors. To do that you just apply the Threshold filter (Image/Adjust/Threshold), using just the default setting - just click OK after it opens. Now choose the Magic Wand tool, and in the Options for the tool make sure that the 'Contiguous' option is NOT ticked. Then click anywhere on the black in the image, and press Delete. Then Deselect.
| Step 5 |
Grab the bottom-middle control handle and stretch the height of the rectangle downward until it's the same height as you want the motion trail to be in your image. For our example here, stretch it down to about the middle of the planet. Press the Enter/Return key when you're done scaling.
| Step 6 |
 Now choose the Transform/Perspective tool (Edit/Transform/Perspective).
Grab the right corner control handle and drag it inward right into the center - on top of the center control handle. When you do this, you should also see the left corner handle move inward at the same time. But if it doesn't, just grab it and drag it into the center also, right on top of the right and center handles. If you can make it look like there's only one control handle that's in the center, that's what you want to do (see sample image). And this should make the bottom of the rectangle come to a point. Press the Enter/Return key when you're done transforming.
| Step 7 |
| Step 8 |
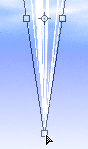
 Our motion trail now needs to be curved.
We'll make it bend to our liking by using the Shear filter. Open that filter now - Filter/Distort/Shear... Now click your mouse in the middle of the center line, which will add a 3rd control handle. Then click on and drag the top, middle, and bottom control handles into the position you see here in the sample image. You'll see your motion trail image react immediately in the preview window, as you move these handles around in the filter window. Click OK when you're done.
| Step 9 |
 Open the Rotate tool now (Edit/Transform/Rotate) and rotate the trail so that it's standing in a straight up and down position. And now you can move your trail into it's final resting position. Basically just line up the large end of the trail to the side of the golf ball. For a better effect, overlap the trail onto the edge of the ball; as seen in this image.
PAGE 1 / 2
Copyright © Mark Anthony Larmand