


Photoshop Tutorials
Motion Trails
PAGE 1 / 2
| Step 10 |
 And finally, add a layer mask to the trail layer; unless you have other things YOU want to do to it.
Then grab a 35-45 pixel soft-edged Airbrush, and paint with black on top of the ball so that you hide the very ends of the motion trail. All you want is just a little bit of the trail's ends to be 'clinging' to the edge of the ball - see sample image. And then... turn down the layer's Opacity to between 50 to 70%.
Done!
| Step 11 - Motion Trail #2: a bouncing motion trail |
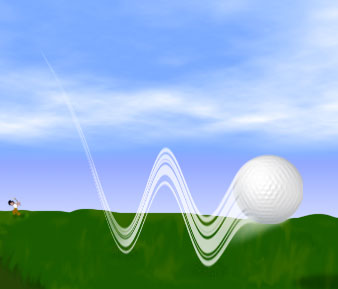 Because this effect uses exactly the same steps as the ones used for the "flying trail" effect, I'm going to shorten the instructions a bit to speed things up. There are just a couple places where the steps need to change a little, but other than that you should breeze right through this one.
I want you to keep in mind that the look of this effect as shown here is not completely correct. At the end of this tutorial, I'll explain why this effect is not as true looking as it could/should be.
Before starting this effect, reopen the original work file you downloaded.
| Step 12 |
Turn off the "earth" image layer. Then move the golf ball layer to the center of the document, right near to the top edge. Now repeat the above steps used for flying motion trails, up until you get to Step 8. This is the point where we're making some additions to our settings in the Shear filter. When you get to Step 8 from the previous steps, return here and continue reading on from Step 2 below.
| Step 13 |
 Use the example image here as reference to see how to setup the Shear filter for a bouncing motion trail effect. Remember, to add a control handle just click on the line where you'd like to add one. To remove a handle, drag it to the right, and outside of the adjustment window. And if all heck breaks loose... you can remove all of the control handles and start over by clicking the 'Default' button on the right.
It helps in this case to think of the control handles that are inserted the farthest on the right side, as your 'floor' that your object will actually be bouncing on - once you rotate it 90° clock-wise. Have a look at the image here, for a visual example of this concept.
| Step 14 |
| Step 15 |
Details: If you like, you can make the bouncing (or flying) trail fade into the distance, at it's starting point (see sample image), by applying a Linear Gradient to it's layer mask. However, you should do this task before you paint out the overhanging part of the trail on the golf ball (Step 10).
T I P S
 Even though this effect would almost always be used in a cartoonish situation or image, we've managed to create a pretty good effect of it here. However, one of the most obvious things that would stand out to a trained eye is how the bends in our 'bounce' are incorrect looking. In a true bounce the hit-points, or points of contact with the ground or surface, would have more of a sharp angle or arc upward to them. Ours are fairly rounded looking. Take a look at this example image, showing what I mean. The red line represents a truer bounce path than the one we've created -- although ours will do in a pinch.
But producing a path like that using the Shear, or even trying the Wave filter, would prove a bit more tasking. Specifically because those filters only effect the overall general shape of our image - i.e. they push the pixels around in a very general manner. They do not, and cannot move or manipulate very selective areas of pixels, or groups of pixels. About the best way to create a bounce path that is more true-to-form would be to use the Path tool, and Stroke it with a fairly wide brush. But then, you'd have to come up with a way to create the trail 'stream' that follows an object. In other words, put the spaces into the trail so it's not just a solid shape.
Consider that a homework assignment then -- if you're feeling up to a challenge.
See if you can figure out how to solve the above problem, after creating a proper motion trail using the Path tool, and Stroking it with a large brush. I've worked on this myself, and have a solution I think comes off pretty good. In fact, it's a relatively straight-forward solution too. So you can rest assured that it IS possible, and not just a trick question.
Good luck!
Copyright © Mark Anthony Larmand
For help, advice, tips and tricks, challenges, feel free to visit our
PAGE 1 / 2