
Note: I won't kid you here folks, half way through the following steps you may think to yourself - "Man! There are a LOT of steps to this effect!". And I won't disagree with you... there ARE a lot of steps (don't worry, each page is pretty short). But my methods, and the effect I'm trying to create, are a bit more involved than you may be used to. I like my effects to have a lot of details, so they have a better chance of looking more realistic. I hope you feel the same way... or at the least, after you learn my technique I hope you do.
Ok lets start by creating a New Document (Ctrl/Cmd+n). The dimensions will be 300x200 pixels, and with a White Background.
Before getting into creating the glass/plastic button, we'll need to make a thin pinstriped background - the way notebook paper looks. It's simple, so lets do that now.
Before getting into creating the glass/plastic button, we'll need to make a thin pinstriped background - the way notebook paper looks. It's simple, so lets do that now.
Create a new temporary document. Make it 1 pixel by 1 pixel, and with the default white background.
Fill the document with a medium gray - click on the Foreground color swatch and enter 153 in all of the Red, Green & Blue number boxes. Then make sure the background swatch is set to white.
Right-click on the title bar of the document and choose Canvas Size from the menu. Expand the height to 8 pixels, and click on the bottom center square in the layout grid. Then click Ok to apply the changes.
You'll notice now that you have a tall thin strip, with 7 pixels of white in the top and 1 pixel of gray in the bottom.
Select all (Ctrl/Cmd+a). Open the Edit menu and choose Define Pattern. Give the pattern a name - like 'pinstripe - 8px'. When you click the OK button, the new pattern will be saved and added to your patterns palette. You can now close the original pattern document; choose NO when asked to save the document. Now we'll use the Fill command to fill our background layer with the pinstripe pattern.
Activate the glass button document's Background layer, by clicking on it. Then open the Edit menu and choose 'Fill...'. Within the 'Contents' submenu choose 'Pattern'. Then click the small arrow to the right of the words 'Custom Pattern'. Choose the new pinstripe pattern you created (double-click on it or click once and press Enter/Return). Leave the other settings as they are, and click OK.
Now we'll move on to creating the glass/plastic button.
I don't know if you all have your own methods of creating a pill shaped button, but I'd like you to follow my methods outlined below please. This will ensure a closer result of the final image, that I'm sure you'll be expecting to get, from following these instructions. The following technique is the absolute simplest method of creating a pill shape; to be as true and 'pill shaped' as it can be.
Creating a pill shape is very simple. All we need to do is combine two filled circles with a rectangle. Start by choosing the rectangular selection tool and making a rectangle; roughly twice as wide as it is high. I made mine 150x75 pixels. Then create a New Layer, and fill the selection with black.
Choose the Elliptical selection tool, and within the Options bar at the top, open the 'Style' menu and choose 'Fixed Size'. Set the height and width to be the same as the height of your rectangle - which will be 75x75 pixels for this example.
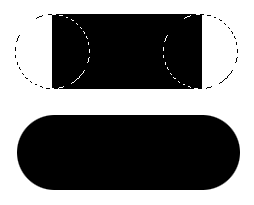
Create a New Layer. Now click your mouse near the top left corner of the rectangle. When the circle appears, drag it over to the left side of the rectangle until it sits half off and half on the rectangle. And the top and bottom edges match up to the rectangle's; if you have to, use the arrow keys to nudge this selection exactly into place. Fill this selection with black. Then drag the selection over to the right side of the rectangle and line it up in the same manner, filling that selection with black also. You can Deselect now (Ctrl/Cmd+d).
Now, if everything looks clean and lined up, and the pill shape looks correct, press Ctrl/Cmd+e to merge the circles layer down into the rectangle layer. Once merged, name the layer 'shadow'. Then to center your shape on the canvas, press and hold the Ctrl/Cmd key down, while you hit the A key, then X key then V key (select all/cut/paste).
| Creating the Glass/Plastic Effect |
The following steps describe how to add a glass/plastic effect.

Duplicate the 'shadow' layer. Rename the duplicate 'glass base'. This will be our base layer. Lock this layer's transparency (put a checkmark in the checkered box, top left side of the layers palette), and fill this shape with a 'Reflected Gradient', using these shades of gray:
| Click this button in the Options bar. |
 |
Foreground: R=128 G=128 B=128 (50% gray)
Background: R=160 G=160 B=160
To apply this type of gradient, start the tool in the middle of the shape or selected area your using it on, and dragging the tool to the top or bottom edge of the shape/selection. So for our purposes, that will put the Foreground color in the middle of the pill shape, with the top and bottom being the lighter gray. Hold down the Shift key while dragging the Grad tool, so that your angle will be in perfect alignment vertically.
Adjusting the 'shadow' layer...
Now, before going further, click on the 'shadow' layer and apply a 3 pixel Gaussian blur to the shadow. Then set it's Blend Mode to Multiply and reduce the Opacity to 75%. And last, move this layer down by 20 pixels - hold the Shift key and hit the down arrow key 2 times.
Ctrl/Cmd-click on the 'glass base' layer to create a selection of the pill shape. Now click on the striped bg layer, then press Ctrl/Cmd+j. That gives us a copy of the bg image to blend over top of our button - which will make the button look transparent. Name this layer 'faded bg' and drag the layer to just above the 'glass base' layer. Then change the layer's Blend Mode to Multiply, and drop the Opacity down to 25%. Multiply mode makes just the dark lines show up, and not the white areas. And dropping the Opacity fades the lines out a bit. This gives the button the effect of looking somewhat dense, and not being made of hollow glass/plastic. If you want the glass/plastic to look more dense, drop the Opacity down even further. Turning it up will produce very clear glass/plastic.
And now, before getting into creating all of the detailed highlights and reflections, we'll give our button a color This will be the only source of color for the button. So if you ever want to change the color, this is the layer you'd do it to. And doing so will change the look of the whole button.
Duplicate the 'faded bg' layer, and name the duplicate 'button color'. Then lock this layer's transparency (click in the checkered checkbox, top left side of the layers palette). Switch your Foreground color now to this shade of green: R=51 G=102 B=0. Then press Alt/Option+Delete to fill your shape with the color And lastly, change the layer's Blend Mode to Overlay, and turn the Opacity back up to 100%.
PAGE 1 / 2 / 3 / 4
Copyright © Mark Anthony Larmand


