Change this layer's Blend Mode to Overlay, and reduce the Opacity to 50%.
Once again, Ctrl/Cmd-click the 'button color layer to select the button shape, then create a New Layer at the top of the palette; or move it there if need be. Rename this layer 'main highlight'. Then fill the shape with white. And make sure you have no selection active; press Ctrl/Cmd+d if you're not sure.
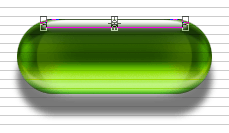
Open the Edit menu and choose 'Transform/Scale'. Scale the shape's width until it matches that of the 'interior highlights' layer. Then, still in the Transform/Scale command, grab the bottom center control node and move it up until the shape's height is half it's original height. Then do this again a make it half of it's current height. Then one more time, make it half of it's current height. It should end up being about 1/8th it's original height. (see example image)
Press the v key. Hit the down arrow key 10 times; moving the highlight down 10 pixels. Now we need to soften the bottom edge of this highlight just a bit. Pick the 'Blur' tool from the toolbar; the 'water drop' icon - press R or Shift+R until the tool shows in the toolbar. Then in the brush palette, choose a brush about 20 pixels in size and with a very soft edge; 0% Hardness. Sweep the brush several times back and forth (left to right), along the bottom half of this highlight; until the edge becomes softened. Then reduce the layer's Opacity to 75%.
Now we'll embellish the 'main highlight' a bit with a duplicate of itself, but set to Overlay Blend Mode so it'll have some color So first, duplicate this layer and leave it's name as is. But move the duplicate layer below the original. Then set it's Blend Mode to Overlay, and return the Opacity back to 100%. And last, move it down 3 pixels.
| Step 1 - Center highlight |
Now we'll create a highlight in the center of the button, which will actually serve as a slight reflection. For this, we need to duplicate the 'main highlight' layer. So do that now, and move this duplicate to the top of the layers palette.
Flip this layer vertically using the 'Transform/Flip Vertical' command. Then to center your shape on the canvas, press and hold the Ctrl/Cmd key down, while you hit the A key, then X key then V key (select all/cut/paste). Then nudge it down to 1-2 pixels below that.
Now use the 'Transform/Scale' function and widen this highlight just a bit; left & right. Make it almost as wide as the full-sized pill shape is.
When you're done widening, reduce the Opacity to only 50%, and change the Blend Mode to Overlay.
| Step 1 - Edge highlight top |
These last 2 highlights will add a lot to the 3D illusion, by helping greatly to create the rounded effect that makes the pill shape look more real. They can also be seen as complex reflections along the top side of the button.
To start this one, Ctrl/Cmd-click on the 'button color layer once again, to select the pill shape. Then create a New Layer at the top of the layers palette, and name the layer 'edge highlight top'. Fill this selection with white.
You'll need to pay close attention to this part, it requires manipulating the selection marquee around a bit. Just read slowly and carefully.
Contract the selection by 10 pixels. Press the m key, then press the up arrow key 5 times; moving the selection up 5 pixels. Press Delete. Now press the down arrow key 10 times, and then the right arrow key 15 times. Then press Delete again. And finally, hold the Shift key down and press the left arrow key 3 times, then hit Delete one more time.
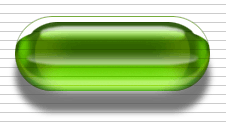
And then press Ctrl/Cmd+d to Deselect. Use the Eraser tool now and erase the extra bit we missed along the bottom of the button.
The example image here shows the type of shape you should end up with. If yours looks a lot different, then redo this step. Otherwise, what you have should work ok.
Press the v key, to choose the Move tool, and hit the down arrow key 1 time. Then change the Blend Mode to Overlay, and reduce the Opacity to 25%.
And finally, we have a normal type of highlight for the very top edge of the button. This highlight will combine with the previous one to create some specific bright spots at the top corners of the pill shape. Ctrl/Cmd-click the 'button color layer once again, and create a New Layer at the top of the layers palette. Name the layer 'top highlight', and fill the selection with white. Pick any selection tool (rectangle will do), and press the down arrow key 10 times.
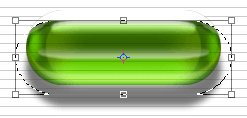
Open the Selection menu and choose the option 'Transform Selection'. Hold down the Alt/Option key while dragging the right middle control node outward - increasing the width of the selection by about 10-15 pixels. (see example image)
Press the Enter/Return key, then hit the Delete key. And then, Deselect.
Press the v key, and hit the down arrow key 5 times. Set this layer to Overlay, and reduce the Opacity to 75%.
| 3D Characteristics - the finishing touches |
If you've ever actually put a clear, colored capsule like this down on a solid colored surface, you'd notice that the shadow is not really solid, or black. If the room lighting is flowing through the capsule, you'll see lots of light bouncing off the outer surface, and also around the inside of the capsule too. And if the capsule is transparent or even semi-transparent, the light will pass through the capsule and be seen as part of the inner body of the shadow the capsule casts. And the shadow itself will contain the same or a similar color as that of the capsule. The same effect can be seen using a marble also.
So to add further realism to our effect, we need to create the inner 'glow' of our button's shadow, and change the shadow's color to match our button's color To do that, do the following:
| Step 1 - Shadow glow and color |
Duplicate the 'shadow' layer, and rename it 'shadow glow'. Press Ctrl/Cmd+i to invert the black to white. Set this layer to Overlay, at 50% Opacity. Then with the Move tool chosen, use the up arrow key to move this layer up 3 pixels. And now, under the Filter menu, choose 'Other/Maximum...'. Set this filter to 5 pixels - this will shrink our object down in size by 5 pixels.
And now, click on the 'shadow' layer, and change the shadow's color to the same green you used for the pill button - R=51 G=102 B=0.
Double-check that this layer is set to Multiply and at 75% Opacity.
| Step 1 - Adding Text - to complete the illusion |
Putting text either on the outer surface or within the inner space of the capsule can help strengthen the 3D effect and look of this pill button. But in either case, we need to keep in mind how the light will effect the text we use. For this project, we're putting the text on the inside of the capsule, not on it's surface.
Click on the 'faded bg' layer. Then choose the Type tool and click on the left side of the button, roughly where you'd like your text to start from. Later on, you can use your own label, but for this example just type the word 'Button', as I've done.
When you've typed the word and chosen the font you want to use (any font should work as an example; I used Arial), click on the new layer created for your text. Then, if your text isn't already white, fill it with white now. For this example, it doesn't matter if you Rasterize this type layer or not; it won't effect the final image. But reduce the layer's Opacity to 50% - to let it blend in with the body of the button.
Now if you look closely at your text, you may be noticing that you can sort of see the dark lines of the background image showing through your text. Well, the text is supposed to be solid here, so that will have to be fixed. To do that, we'll use a Layer Mask on the 'faded bg' layer. Ctrl/Cmd-click on your text layer. Now click the 'faded bg' layer to activate it. Open the LAYER menu and click on 'Add Layer Mask', then choose 'Hide Selection'
For a shadow of the text, duplicate the type layer, move this layer below the original type, set it's Blend Mode to Soft Light, and reduce it's Opacity to 35%. Then fill this shadow text with black. You may very well like to soften this text shadow a little, and that's ok. Just attempt to apply the 'Blur More' filter to it. Photoshop will advise you that it will have to Rasterize the type layer first, so click OK to let it do this. It will then continue and apply the blurring. To complete this layer, press the v key and hit the down arrow key 10 times; or hold the Shift key and press the down arrow key once.
PAGE 1 / 2 / 3 / 4
Copyright © Mark Anthony Larmand
 Open the Edit menu and choose 'Transform/Scale'. Scale the shape's width until it matches that of the 'interior highlights' layer. Then, still in the Transform/Scale command, grab the bottom center control node and move it up until the shape's height is half it's original height. Then do this again a make it half of it's current height. Then one more time, make it half of it's current height. It should end up being about 1/8th it's original height. (see example image)
 And then press Ctrl/Cmd+d to Deselect. Use the Eraser tool now and erase the extra bit we missed along the bottom of the button.
 Open the Selection menu and choose the option 'Transform Selection'. Hold down the Alt/Option key while dragging the right middle control node outward - increasing the width of the selection by about 10-15 pixels. (see example image)


