


Photoshop Tutorials
Realistic Glass and Plastic Pill Buttons
| Additional details for more effect |
| Step 1 - Depth lighting |
| Step 2 |
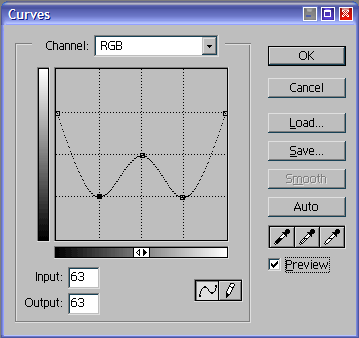 Open the Curves filter. The curve line shown in the example image here will produce the effect we need. This should turn the simple black-to-white gradient into a multi-level gradient; containing 3 light streaks and 2 dark ones - light/dark/light/dark/light.
Change this layer's Blend Mode to Soft Light.
T I P: See those 3 highest control nodes along the curve line? Those represent the 3 light streaks in our gradient. And the 2 lowest nodes along the curve line are creating the 2 dark streaks in our gradient. So do you understand here how the curve filter is altering our original image? Good!
| Step 1 - Reflections and textures |
Create a New Layer, above the previous 'depth lighting' layer. Name the layer 'reflections'. Ctrl/Cmd-click the 'button color to select the button shape. Make sure you're on the 'reflections' layer, then click the 'Add a Mask' icon - or go to 'Layer menu/Add Layer Mask/Reveal Selection'.
| Step 2 |
 Now generally, you'll want to leave the Opacity set to around 20-35%, for most types of textures. But the Blend Mode can vary widely. Using Multiply will produce a completely different look/effect than using Luminosity, or Hard Light. The Blend Mode you use is wide open and completely up to you, so... in the spirit for which I'm usually heard screaming - EXPERIMENT! EXPERIMENT! EXPERIMENT!
This part of the effect can really make YOUR buttons look completely original from anyone else's. So play with this part of the design a lot, until you really find something that strikes your fancy - or at least looks original!
| Tips on realism |
T I P 1
Whenever you're creating a shiny, or reflective effect on some type of object, there are a few things that you need to keep in mind, that will help your effect to appear more realistic. The following are some main important points to be aware of while constructing your object(s) in Photoshop:
- All layers that are to be light reflections or highlights should go on the layers above the layer containing the object's texture pattern, or a solid color filled layer. Highlights are not a natural part of an object physical construction, and therefore should appear to be on top, or over top of the object's surface.
- Layers containing an object's reflections, or images being used for/as reflections, should be below the object's texture pattern layer. Or any colored layer serving to provide the object with color As above, reflections are not a natural part of an object's physical construction. But unlike highlights, an object's reflections are effected by any lighting, color or texture applied to it's surface.
NOTE: because we could also use Photoshop's Layer Blend Modes to simulate a blending of effects between layers, this rule does not always apply to all images, but usually applies to most.
T I P 2
Whenever creating a highlight, or strong light reflection on a shiny object, try not to use a 100 percent Opacity setting for this layer. The viewer's eyes can usually detect this as looking artificial. Even just dropping a strong highlight's Opacity down to 95 percent can help add a bit more realism to the effect; by blending it with underlying layers just a bit.
T I P 3
Do not be afraid to create an imperfect looking object. Perfect looking objects look unrealistic, and frankly, are less fun to create if you ask me. ;) Put some scratches, dirt, uneven highlights or reflections into your objects. That'll keep them looking real to the viewer.
T I P 4
Details... create a lot of them. Big ones, small ones, even almost unnoticeable or subconscious ones. Trust me, the more details you can add/create, the closer to looking realistic your objects will be. Just look around you in the real world and use real objects as reference materials whenever possible.
NOTE: Keep in mind that the way this capsule we've just created looks to your eyes is only ONE way it will look. We've created it from only one specific perspective here. If we were to change our point of view - higher, lower, or from the side - this capsule would look very different from how we've created it - highlights would change places, reflections may or may not be seen, inner glow & highlights would change, etc. Keep all of this in mind for any type of real world objects you might create in Photoshop. This is also why it doesn't really matter if YOUR image looks exactly like MINE does. There are a multitude of ways this effect can look.
Hope you all enjoyed this one? Have fun with it!
For help, advice, tips and tricks, challenges, feel free to visit our
PAGE 1 / 2 / 3 / 4
Copyright © Mark Anthony Larmand